0%

关系数据库入门

关系数据库概述

  1. 数据持久化 - 将数据保存到能够长久保存数据的存储介质中,在掉电的情况下数据也不会丢失。

  2. 数据库发展史 - 网状数据库、层次数据库、关系数据库、NoSQL数据库。

    1970年,IBM的研究员E.F.Codd在Communication of the ACM上发表了名为A Relational Model of Data for Large Shared Data Banks的论文,提出了关系模型的概念,奠定了关系模型的理论基础。后来Codd又陆续发表多篇文章,论述了范式理论和衡量关系系统的12条标准,用数学理论奠定了关系数据库的基础。

  3. 关系数据库特点。

    • 理论基础:集合论和关系代数。

    • 具体表象:用二维表(有行和列)组织数据。

    • 编程语言:结构化查询语言(SQL)。

  4. ER模型(实体关系模型)和概念模型图。

    ER模型,全称为实体关系模型(Entity-Relationship Model),由美籍华裔计算机科学家陈品山先生提出,是概念数据模型的高层描述方式,如下图所示。
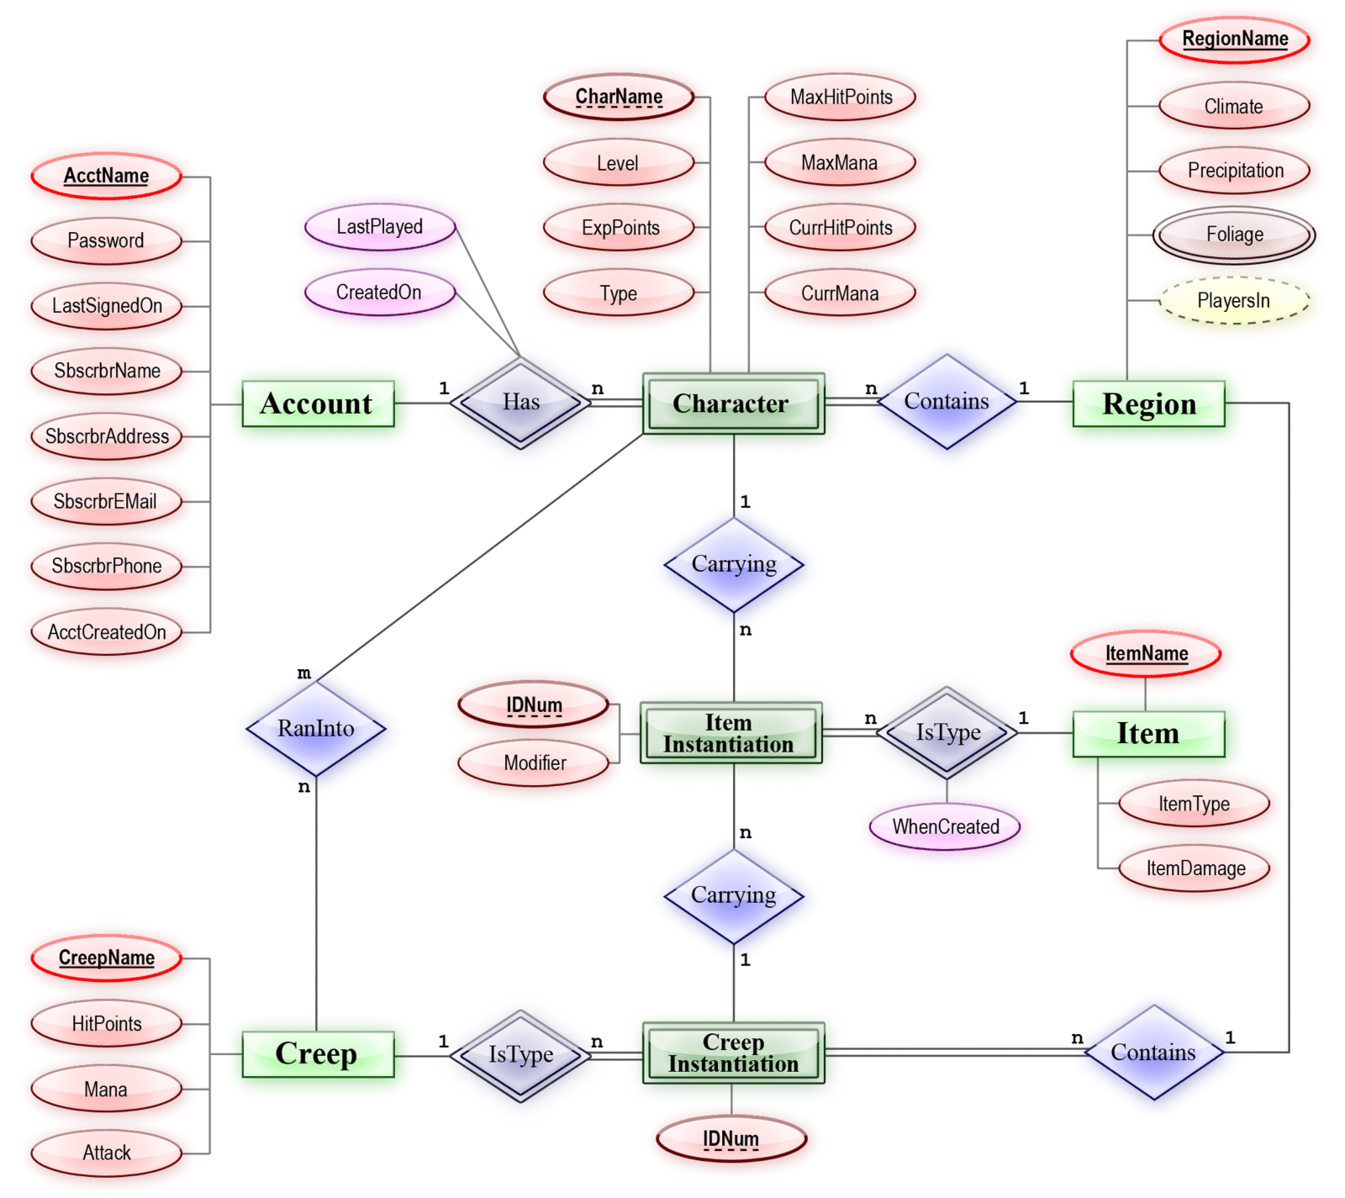
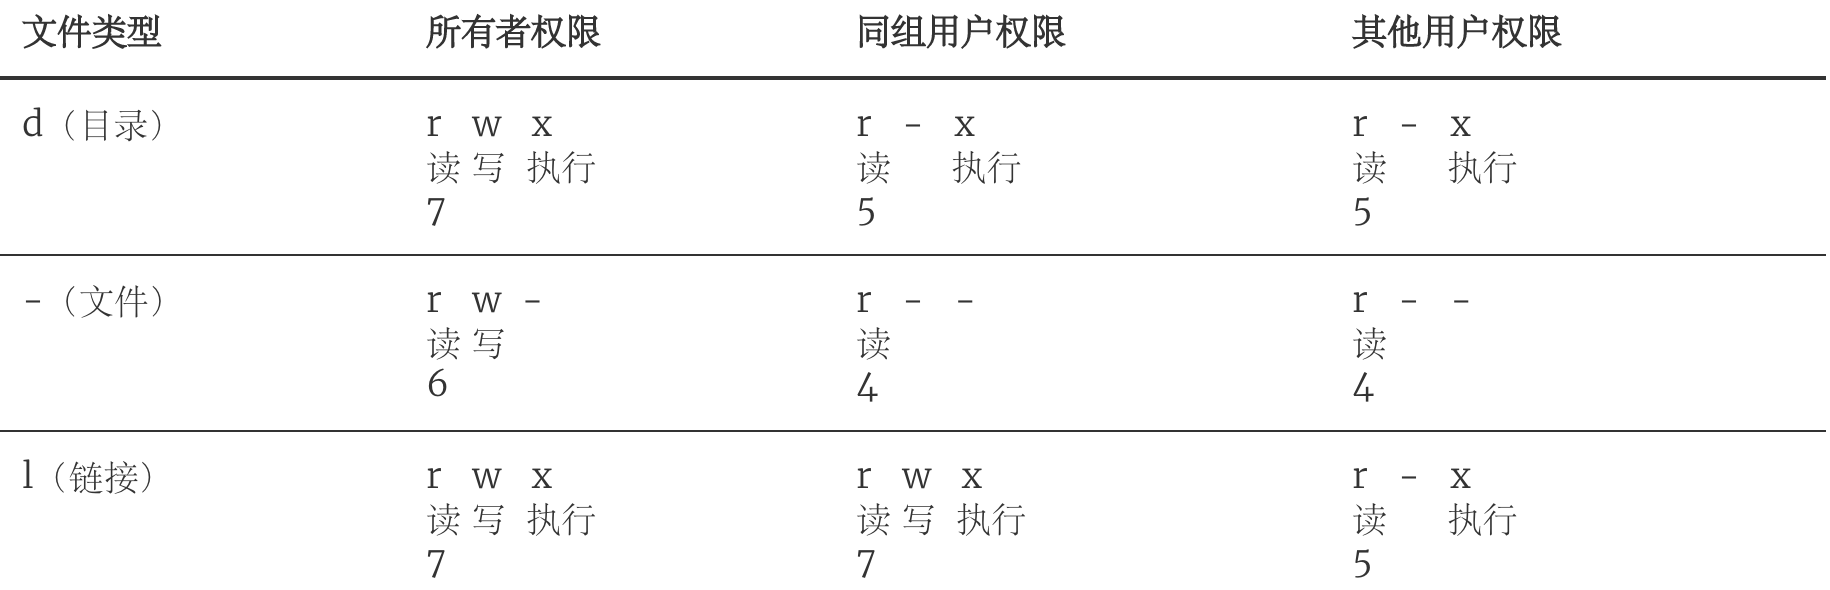
    • 实体 - 矩形框
    • 属性 - 椭圆框
    • 关系 - 菱形框
    • 重数 - 1:1(一对一) / 1:N(一对多) / M:N(多对多)

    实际项目开发中,我们可以利用数据库建模工具(如:PowerDesigner)来绘制概念数据模型(其本质就是ER模型),然后再设置好目标数据库系统,将概念模型转换成物理模型,最终生成创建二维表的SQL(很多工具都可以根据我们设计的物理模型图以及设定的目标数据库来导出SQL或直接生成数据表)。

  5. 关系数据库产品。

    • Oracle - 目前世界上使用最为广泛的数据库管理系统,作为一个通用的数据库系统,它具有完整的数据管理功能;作为一个关系数据库,它是一个完备关系的产品;作为分布式数据库,它实现了分布式处理的功能。在Oracle最新的12c版本中,还引入了多承租方架构,使用该架构可轻松部署和管理数据库云。
    • DB2 - IBM公司开发的、主要运行于Unix(包括IBM自家的AIX)、Linux、以及Windows服务器版等系统的关系数据库产品。DB2历史悠久且被认为是最早使用SQL的数据库产品,它拥有较为强大的商业智能功能。
    • SQL Server - 由Microsoft开发和推广的关系型数据库产品,最初适用于中小企业的数据管理,但是近年来它的应用范围有所扩展,部分大企业甚至是跨国公司也开始基于它来构建自己的数据管理系统。
    • MySQL - MySQL是开放源代码的,任何人都可以在GPL(General Public License)的许可下下载并根据个性化的需要对其进行修改。MySQL因为其速度、可靠性和适应性而备受关注。
    • PostgreSQL - 在BSD许可证下发行的开放源代码的关系数据库产品。

MySQL简介

MySQL最早是由瑞典的MySQL AB公司开发的一个开放源码的关系数据库管理系统,该公司于2008年被昇阳微系统公司(Sun Microsystems)收购。在2009年,甲骨文公司(Oracle)收购昇阳微系统公司,因此在这之后MySQL成为了Oracle旗下产品。

MySQL在过去由于性能高、成本低、可靠性好,已经成为最流行的开源数据库,因此被广泛地应用于中小型网站开发。随着MySQL的不断成熟,它也逐渐被应用于更多大规模网站和应用,比如维基百科、谷歌(Google)、脸书(Facebook)、淘宝网等网站都使用了MySQL来提供数据持久化服务。

甲骨文公司收购后昇阳微系统公司,大幅调涨MySQL商业版的售价,且甲骨文公司不再支持另一个自由软件项目OpenSolaris的发展,因此导致自由软件社区对于Oracle是否还会持续支持MySQL社区版(MySQL的各个发行版本中唯一免费的版本)有所担忧,MySQL的创始人麦克尔·维德纽斯以MySQL为基础,成立分支计划MariaDB(以他女儿的名字命名的数据库)。有许多原来使用MySQL数据库的公司(例如:维基百科)已经陆续完成了从MySQL数据库到MariaDB数据库的迁移。

  1. 安装和配置

    说明:下面的安装和配置都是以CentOS Linux环境为例,如果需要在其他系统下安装MySQL,读者可以自行在网络上查找对应的安装教程)。

    • 刚才说过,MySQL有一个分支版本名叫MariaDB,该数据库旨在继续保持MySQL数据库在GNU GPL下开源。如果要使用MariaDB作为MySQL的替代品,可以使用下面的命令进行安装。

      1
      yum install mariadb mariadb-server
    • 如果要安装官方版本的MySQL,可以在MySQL官方网站下载安装文件。首先在下载页面中选择平台和版本,然后找到对应的下载链接。下面以MySQL 5.7.26版本和Red Hat Enterprise Linux为例,直接下载包含所有安装文件的归档文件,解归档之后通过包管理工具进行安装。

      1
      2
      wget https://dev.mysql.com/get/Downloads/MySQL-5.7/mysql-5.7.26-1.el7.x86_64.rpm-bundle.tar
      tar -xvf mysql-5.7.26-1.el7.x86_64.rpm-bundle.tar

      如果系统上有MariaDB相关的文件,需要先移除MariaDB相关的文件。

      1
      yum list installed | grep mariadb | awk '{print $1}' | xargs yum erase -y

      接下来可以按照如下所示的顺序用RPM(Redhat Package Manager)工具安装MySQL。

      1
      2
      3
      4
      rpm -ivh mysql-community-common-5.7.26-1.el7.x86_64.rpm
      rpm -ivh mysql-community-libs-5.7.26-1.el7.x86_64.rpm
      rpm -ivh mysql-community-client-5.7.26-1.el7.x86_64.rpm
      rpm -ivh mysql-community-server-5.7.26-1.el7.x86_64.rpm

      可以使用下面的命令查看已经安装的MySQL相关的包。

      1
      rpm -qa | grep mysql
    • 配置MySQL。

      MySQL的配置文件在/etc目录下,名为my.cnf,默认的配置文件内容如下所示。如果对这个文件不理解并没有关系,什么时候用到这个配置文件什么时候再了解它就行了。

      1
      cat /etc/my.cnf
      1
      2
      3
      4
      5
      6
      7
      8
      9
      10
      11
      12
      13
      14
      15
      16
      17
      18
      19
      20
      21
      22
      23
      24
      25
      26
      27
      # For advice on how to change settings please see
      # http://dev.mysql.com/doc/refman/5.7/en/server-configuration-defaults.html

      [mysqld]
      #
      # Remove leading # and set to the amount of RAM for the most important data
      # cache in MySQL. Start at 70% of total RAM for dedicated server, else 10%.
      # innodb_buffer_pool_size = 128M
      #
      # Remove leading # to turn on a very important data integrity option: logging
      # changes to the binary log between backups.
      # log_bin
      #
      # Remove leading # to set options mainly useful for reporting servers.
      # The server defaults are faster for transactions and fast SELECTs.
      # Adjust sizes as needed, experiment to find the optimal values.
      # join_buffer_size = 128M
      # sort_buffer_size = 2M
      # read_rnd_buffer_size = 2M
      datadir=/var/lib/mysql
      socket=/var/lib/mysql/mysql.sock

      # Disabling symbolic-links is recommended to prevent assorted security risks
      symbolic-links=0

      log-error=/var/log/mysqld.log
      pid-file=/var/run/mysqld/mysqld.pid
    • 启动MySQL服务。

      可以使用下面的命令来启动MySQL。

      1
      service mysqld start

      在CentOS 7中,更推荐使用下面的命令来启动MySQL。

      1
      systemctl start mysqld

      启动MySQL成功后,可以通过下面的命令来检查网络端口使用情况,MySQL默认使用3306端口。

      1
      netstat -ntlp | grep mysql

      也可以使用下面的命令查找是否有名为mysqld的进程。

      1
      pgrep mysqld
    • 使用MySQL客户端工具连接服务器。

      命令行工具:

      1
      mysql -u root -p

      说明:启动客户端时,-u参数用来指定用户名,MySQL默认的超级管理账号为root-p表示要输入密码(用户口令);如果连接的是其他主机而非本机,可以用-h来指定连接主机的主机名或IP地址。

      如果是首次安装MySQL,可以使用下面的命令来找到默认的初始密码。

      1
      cat /var/log/mysqld.log | grep password

      上面的命令会查看MySQL的日志带有password的行,在显示的结果中root@localhost:后面的部分就是默认设置的初始密码。

      修改超级管理员(root)的访问口令为123456

      1
      2
      3
      set global validate_password_policy=0;
      set global validate_password_length=6;
      alter user 'root'@'localhost' identified by '123456';

      说明:MySQL较新的版本默认不允许使用弱口令作为用户口令,所以我们通过上面的前两条命令修改了验证用户口令的策略和口令的长度。事实上我们不应该使用弱口令,因为存在用户口令被暴力破解的风险。近年来,攻击数据库窃取数据和劫持数据库勒索比特币的事件屡见不鲜,要避免这些潜在的风险,最为重要的一点是不要让数据库服务器暴露在公网上(最好的做法是将数据库置于内网,至少要做到不向公网开放数据库服务器的访问端口),另外要保管好root账号的口令,应用系统需要访问数据库时,通常不使用root账号进行访问,而是创建其他拥有适当权限的账号来访问。

      再次使用客户端工具连接MySQL服务器时,就可以使用新设置的口令了。在实际开发中,为了方便用户操作,可以选择图形化的客户端工具来连接MySQL服务器,包括:

      • MySQL Workbench(官方提供的工具)
      • Navicat for MySQL(界面简单优雅,功能直观强大)
      • SQLyog for MySQL(强大的MySQL数据库管理员工具)
  2. 常用命令。

    • 查看服务器版本。

      1
      select version();
    • 查看所有数据库。

      1
      show databases;
    • 切换到指定数据库。

      1
      use mysql;
    • 查看数据库下所有表。

      1
      show tables;
    • 获取帮助。

      1
      2
      3
      4
      5
      6
      7
      ? contents;
      ? functions;
      ? numeric functions;
      ? round;

      ? data types;
      ? longblob;

SQL详解

基本操作

我们通常可以将SQL分为三类:DDL(数据定义语言)、DML(数据操作语言)和DCL(数据控制语言)。DDL主要用于创建(create)、删除(drop)、修改(alter)数据库中的对象,比如创建、删除和修改二维表;DML主要负责插入数据(insert)、删除数据(delete)、更新数据(update)和查询(select);DCL通常用于授予权限(grant)和召回权限(revoke)。

说明:SQL是不区分大小写的语言,为了书写方便,下面的SQL都使用了小写字母来书写。

  1. DDL(数据定义语言)

    1
    2
    3
    4
    5
    6
    7
    8
    9
    10
    11
    12
    13
    14
    15
    16
    17
    18
    19
    20
    21
    22
    23
    24
    25
    26
    27
    28
    29
    30
    31
    32
    33
    34
    35
    36
    37
    38
    39
    40
    41
    42
    43
    44
    45
    46
    47
    48
    49
    50
    51
    52
    53
    54
    55
    56
    57
    58
    59
    60
    61
    62
    63
    64
    65
    66
    -- 如果存在名为school的数据库就删除它
    drop database if exists school;

    -- 创建名为school的数据库并设置默认的字符集和排序方式
    create database school default charset utf8 collate utf8_bin;

    -- 切换到school数据库上下文环境
    use school;

    -- 创建学院表
    create table tb_college
    (
    collid int auto_increment comment '编号',
    collname varchar(50) not null comment '名称',
    collmaster varchar(20) not null comment '院长',
    primary key (collid)
    );

    -- 创建学生表
    create table tb_student
    (
    stuid int not null comment '学号',
    stuname varchar(20) not null comment '姓名',
    stusex boolean default 1 comment '性别',
    stubirth date not null comment '出生日期',
    stuaddr varchar(255) default '' comment '籍贯',
    collid int not null comment '所属学院',
    primary key (stuid),
    foreign key (collid) references tb_college (collid)
    );

    -- 创建教师表
    create table tb_teacher
    (
    teaid int not null comment '工号',
    teaname varchar(20) not null comment '姓名',
    teatitle varchar(10) default '助教' comment '职称',
    collid int not null comment '所属学院',
    primary key (teaid),
    foreign key (collid) references tb_college (collid)
    );

    -- 创建课程表
    create table tb_course
    (
    couid int not null comment '编号',
    couname varchar(50) not null comment '名称',
    coucredit int not null comment '学分',
    teaid int not null comment '授课老师',
    primary key (couid),
    foreign key (teaid) references tb_teacher (teaid)
    );

    -- 创建选课记录表
    create table tb_record
    (
    recid int auto_increment comment '选课记录编号',
    sid int not null comment '选课学生',
    cid int not null comment '所选课程',
    seldate datetime default now() comment '选课时间日期',
    score decimal(4,1) comment '考试成绩',
    primary key (recid),
    foreign key (sid) references tb_student (stuid),
    foreign key (cid) references tb_course (couid),
    unique (sid, cid)
    );

    上面的DDL有几个地方需要强调一下:

    • 创建数据库时,我们通过default charset utf8指定了数据库默认使用的字符集,我们推荐使用该字符集,因为utf8能够支持国际化编码。如果将来数据库中用到的字符可能包括类似于Emoji这样的图片字符,也可以将默认字符集设定为utf8mb4(最大4字节的utf-8编码)。查看MySQL支持的字符集可以执行下面的语句。

      1
      show character set;
      1
      2
      3
      4
      5
      6
      7
      8
      9
      10
      11
      12
      13
      14
      15
      16
      17
      18
      19
      20
      21
      22
      23
      24
      25
      26
      27
      28
      29
      30
      31
      32
      33
      34
      35
      36
      37
      38
      39
      40
      41
      42
      43
      44
      45
      46
      +----------+---------------------------------+---------------------+--------+
      | Charset | Description | Default collation | Maxlen |
      +----------+---------------------------------+---------------------+--------+
      | big5 | Big5 Traditional Chinese | big5_chinese_ci | 2 |
      | dec8 | DEC West European | dec8_swedish_ci | 1 |
      | cp850 | DOS West European | cp850_general_ci | 1 |
      | hp8 | HP West European | hp8_english_ci | 1 |
      | koi8r | KOI8-R Relcom Russian | koi8r_general_ci | 1 |
      | latin1 | cp1252 West European | latin1_swedish_ci | 1 |
      | latin2 | ISO 8859-2 Central European | latin2_general_ci | 1 |
      | swe7 | 7bit Swedish | swe7_swedish_ci | 1 |
      | ascii | US ASCII | ascii_general_ci | 1 |
      | ujis | EUC-JP Japanese | ujis_japanese_ci | 3 |
      | sjis | Shift-JIS Japanese | sjis_japanese_ci | 2 |
      | hebrew | ISO 8859-8 Hebrew | hebrew_general_ci | 1 |
      | tis620 | TIS620 Thai | tis620_thai_ci | 1 |
      | euckr | EUC-KR Korean | euckr_korean_ci | 2 |
      | koi8u | KOI8-U Ukrainian | koi8u_general_ci | 1 |
      | gb2312 | GB2312 Simplified Chinese | gb2312_chinese_ci | 2 |
      | greek | ISO 8859-7 Greek | greek_general_ci | 1 |
      | cp1250 | Windows Central European | cp1250_general_ci | 1 |
      | gbk | GBK Simplified Chinese | gbk_chinese_ci | 2 |
      | latin5 | ISO 8859-9 Turkish | latin5_turkish_ci | 1 |
      | armscii8 | ARMSCII-8 Armenian | armscii8_general_ci | 1 |
      | utf8 | UTF-8 Unicode | utf8_general_ci | 3 |
      | ucs2 | UCS-2 Unicode | ucs2_general_ci | 2 |
      | cp866 | DOS Russian | cp866_general_ci | 1 |
      | keybcs2 | DOS Kamenicky Czech-Slovak | keybcs2_general_ci | 1 |
      | macce | Mac Central European | macce_general_ci | 1 |
      | macroman | Mac West European | macroman_general_ci | 1 |
      | cp852 | DOS Central European | cp852_general_ci | 1 |
      | latin7 | ISO 8859-13 Baltic | latin7_general_ci | 1 |
      | utf8mb4 | UTF-8 Unicode | utf8mb4_general_ci | 4 |
      | cp1251 | Windows Cyrillic | cp1251_general_ci | 1 |
      | utf16 | UTF-16 Unicode | utf16_general_ci | 4 |
      | utf16le | UTF-16LE Unicode | utf16le_general_ci | 4 |
      | cp1256 | Windows Arabic | cp1256_general_ci | 1 |
      | cp1257 | Windows Baltic | cp1257_general_ci | 1 |
      | utf32 | UTF-32 Unicode | utf32_general_ci | 4 |
      | binary | Binary pseudo charset | binary | 1 |
      | geostd8 | GEOSTD8 Georgian | geostd8_general_ci | 1 |
      | cp932 | SJIS for Windows Japanese | cp932_japanese_ci | 2 |
      | eucjpms | UJIS for Windows Japanese | eucjpms_japanese_ci | 3 |
      | gb18030 | China National Standard GB18030 | gb18030_chinese_ci | 4 |
      +----------+---------------------------------+---------------------+--------+
      41 rows in set (0.00 sec)

      如果要设置MySQL服务启动时默认使用的字符集,可以修改MySQL的配置并添加以下内容

      1
      2
      [mysqld]
      character-set-server=utf8
    • 在创建表的时候,我们可以在右圆括号的后面通过engine=XXX来指定表的存储引擎,MySQL支持多种存储引擎,可以通过show engines命令进行查看。MySQL 5.5以后的版本默认使用的存储引擎是InnoDB,它正好也就是我们推荐大家使用的存储引擎(因为InnoDB更适合互联网应用对高并发、性能以及事务支持等方面的需求)。

      1
      show engines\G
      1
      2
      3
      4
      5
      6
      7
      8
      9
      10
      11
      12
      13
      14
      15
      16
      17
      18
      19
      20
      21
      22
      23
      24
      25
      26
      27
      28
      29
      30
      31
      32
      33
      34
      35
      36
      37
      38
      39
      40
      41
      42
      43
      44
      45
      46
      47
      48
      49
      50
      51
      52
      53
      54
      55
      56
      57
      58
      59
      60
      61
      62
      63
      64
      *************************** 1. row ***************************
      Engine: InnoDB
      Support: DEFAULT
      Comment: Supports transactions, row-level locking, and foreign keys
      Transactions: YES
      XA: YES
      Savepoints: YES
      *************************** 2. row ***************************
      Engine: MRG_MYISAM
      Support: YES
      Comment: Collection of identical MyISAM tables
      Transactions: NO
      XA: NO
      Savepoints: NO
      *************************** 3. row ***************************
      Engine: MEMORY
      Support: YES
      Comment: Hash based, stored in memory, useful for temporary tables
      Transactions: NO
      XA: NO
      Savepoints: NO
      *************************** 4. row ***************************
      Engine: BLACKHOLE
      Support: YES
      Comment: /dev/null storage engine (anything you write to it disappears)
      Transactions: NO
      XA: NO
      Savepoints: NO
      *************************** 5. row ***************************
      Engine: MyISAM
      Support: YES
      Comment: MyISAM storage engine
      Transactions: NO
      XA: NO
      Savepoints: NO
      *************************** 6. row ***************************
      Engine: CSV
      Support: YES
      Comment: CSV storage engine
      Transactions: NO
      XA: NO
      Savepoints: NO
      *************************** 7. row ***************************
      Engine: ARCHIVE
      Support: YES
      Comment: Archive storage engine
      Transactions: NO
      XA: NO
      Savepoints: NO
      *************************** 8. row ***************************
      Engine: PERFORMANCE_SCHEMA
      Support: YES
      Comment: Performance Schema
      Transactions: NO
      XA: NO
      Savepoints: NO
      *************************** 9. row ***************************
      Engine: FEDERATED
      Support: NO
      Comment: Federated MySQL storage engine
      Transactions: NULL
      XA: NULL
      Savepoints: NULL
      9 rows in set (0.00 sec)

      下面的表格对MySQL几种常用的数据引擎进行了简单的对比。

      特性 InnoDB MRG_MYISAM MEMORY MyISAM
      存储限制 没有
      事务 支持
      锁机制 行锁 表锁 表锁 表锁
      B树索引 支持 支持 支持 支持
      哈希索引 支持
      全文检索 支持(5.6+) 支持
      集群索引 支持
      数据缓存 支持 支持
      索引缓存 支持 支持 支持 支持
      数据可压缩 支持
      内存使用
      存储空间使用
      批量插入性能
      是否支持外键 支持

      通过上面的比较我们可以了解到,InnoDB是唯一能够支持外键、事务以及行锁的存储引擎,所以我们之前说它更适合互联网应用,而且它也是较新的MySQL版本中默认使用的存储引擎。

    • 在定义表结构为每个字段选择数据类型时,如果不清楚哪个数据类型更合适,可以通过MySQL的帮助系统来了解每种数据类型的特性、数据的长度和精度等相关信息。

      1
      ? data types
      1
      2
      3
      4
      5
      6
      7
      8
      9
      10
      11
      12
      13
      14
      15
      16
      17
      18
      19
      20
      21
      22
      23
      24
      25
      26
      27
      28
      29
      30
      31
      32
      33
      34
      35
      36
      37
      38
      You asked for help about help category: "Data Types"
      For more information, type 'help <item>', where <item> is one of the following
      topics:
      AUTO_INCREMENT
      BIGINT
      BINARY
      BIT
      BLOB
      BLOB DATA TYPE
      BOOLEAN
      CHAR
      CHAR BYTE
      DATE
      DATETIME
      DEC
      DECIMAL
      DOUBLE
      DOUBLE PRECISION
      ENUM
      FLOAT
      INT
      INTEGER
      LONGBLOB
      LONGTEXT
      MEDIUMBLOB
      MEDIUMINT
      MEDIUMTEXT
      SET DATA TYPE
      SMALLINT
      TEXT
      TIME
      TIMESTAMP
      TINYBLOB
      TINYINT
      TINYTEXT
      VARBINARY
      VARCHAR
      YEAR DATA TYPE
      1
      ? varchar
      1
      2
      3
      4
      5
      6
      7
      8
      9
      10
      11
      12
      13
      14
      15
      16
      17
      18
      19
      20
      21
      22
      23
      24
      25
      26
      27
      28
      29
      30
      31
      Name: 'VARCHAR'
      Description:
      [NATIONAL] VARCHAR(M) [CHARACTER SET charset_name] [COLLATE
      collation_name]

      A variable-length string. M represents the maximum column length in
      characters. The range of M is 0 to 65,535. The effective maximum length
      of a VARCHAR is subject to the maximum row size (65,535 bytes, which is
      shared among all columns) and the character set used. For example, utf8
      characters can require up to three bytes per character, so a VARCHAR
      column that uses the utf8 character set can be declared to be a maximum
      of 21,844 characters. See
      http://dev.mysql.com/doc/refman/5.7/en/column-count-limit.html.

      MySQL stores VARCHAR values as a 1-byte or 2-byte length prefix plus
      data. The length prefix indicates the number of bytes in the value. A
      VARCHAR column uses one length byte if values require no more than 255
      bytes, two length bytes if values may require more than 255 bytes.

      *Note*:

      MySQL follows the standard SQL specification, and does not remove
      trailing spaces from VARCHAR values.

      VARCHAR is shorthand for CHARACTER VARYING. NATIONAL VARCHAR is the
      standard SQL way to define that a VARCHAR column should use some
      predefined character set. MySQL uses utf8 as this predefined character
      set. http://dev.mysql.com/doc/refman/5.7/en/charset-national.html.
      NVARCHAR is shorthand for NATIONAL VARCHAR.

      URL: http://dev.mysql.com/doc/refman/5.7/en/string-type-overview.html

      在数据类型的选择上,保存字符串数据通常都使用VARCHAR和CHAR两种类型,前者通常称为变长字符串,而后者通常称为定长字符串;对于InnoDB存储引擎,行存储格式没有区分固定长度和可变长度列,因此VARCHAR类型好CHAR类型没有本质区别,后者不一定比前者性能更好。如果要保存的很大字符串,可以使用TEXT类型;如果要保存很大的字节串,可以使用BLOB(二进制大对象)类型。在MySQL中,TEXT和BLOB又分别包括TEXT、MEDIUMTEXT、LONGTEXT和BLOB、MEDIUMBLOB、LONGBLOB三种不同的类型,它们主要的区别在于存储数据的最大大小不同。保存浮点数可以用FLOAT或DOUBLE类型,而保存定点数应该使用DECIMAL类型。如果要保存时间日期,DATETIME类型优于TIMESTAMP类型,因为前者能表示的时间日期范围更大。

  2. DML

    1
    2
    3
    4
    5
    6
    7
    8
    9
    10
    11
    12
    13
    14
    15
    16
    17
    18
    19
    20
    21
    22
    23
    24
    25
    26
    27
    28
    29
    30
    31
    32
    33
    34
    35
    36
    37
    38
    39
    40
    41
    42
    43
    44
    45
    46
    47
    48
    49
    50
    51
    52
    53
    54
    55
    56
    57
    58
    59
    60
    61
    62
    63
    64
    65
    66
    -- 插入学院数据
    insert into tb_college (collname, collmaster) values
    ('计算机学院', '左冷禅'),
    ('外国语学院', '岳不群'),
    ('经济管理学院', '风清扬');

    -- 插入学生数据
    insert into tb_student (stuid, stuname, stusex, stubirth, stuaddr, collid) values
    (1001, '杨逍', 1, '1990-3-4', '四川成都', 1),
    (1002, '任我行', 1, '1992-2-2', '湖南长沙', 1),
    (1033, '王语嫣', 0, '1989-12-3', '四川成都', 1),
    (1572, '岳不群', 1, '1993-7-19', '陕西咸阳', 1),
    (1378, '纪嫣然', 0, '1995-8-12', '四川绵阳', 1),
    (1954, '林平之', 1, '1994-9-20', '福建莆田', 1),
    (2035, '东方不败', 1, '1988-6-30', null, 2),
    (3011, '林震南', 1, '1985-12-12', '福建莆田', 3),
    (3755, '项少龙', 1, '1993-1-25', null, 3),
    (3923, '杨不悔', 0, '1985-4-17', '四川成都', 3),
    (4040, '隔壁老王', 1, '1989-1-1', '四川成都', 2);

    -- 删除学生数据
    delete from tb_student where stuid=4040;

    -- 更新学生数据
    update tb_student set stuname='杨过', stuaddr='湖南长沙' where stuid=1001;

    -- 插入老师数据
    insert into tb_teacher (teaid, teaname, teatitle, collid) values
    (1122, '张三丰', '教授', 1),
    (1133, '宋远桥', '副教授', 1),
    (1144, '杨逍', '副教授', 1),
    (2255, '范遥', '副教授', 2),
    (3366, '韦一笑', '讲师', 3);

    -- 插入课程数据
    insert into tb_course (couid, couname, coucredit, teaid) values
    (1111, 'Python程序设计', 3, 1122),
    (2222, 'Web前端开发', 2, 1122),
    (3333, '操作系统', 4, 1122),
    (4444, '计算机网络', 2, 1133),
    (5555, '编译原理', 4, 1144),
    (6666, '算法和数据结构', 3, 1144),
    (7777, '经贸法语', 3, 2255),
    (8888, '成本会计', 2, 3366),
    (9999, '审计学', 3, 3366);

    -- 插入选课数据
    insert into tb_record (sid, cid, seldate, score) values
    (1001, 1111, '2017-09-01', 95),
    (1001, 2222, '2017-09-01', 87.5),
    (1001, 3333, '2017-09-01', 100),
    (1001, 4444, '2018-09-03', null),
    (1001, 6666, '2017-09-02', 100),
    (1002, 1111, '2017-09-03', 65),
    (1002, 5555, '2017-09-01', 42),
    (1033, 1111, '2017-09-03', 92.5),
    (1033, 4444, '2017-09-01', 78),
    (1033, 5555, '2017-09-01', 82.5),
    (1572, 1111, '2017-09-02', 78),
    (1378, 1111, '2017-09-05', 82),
    (1378, 7777, '2017-09-02', 65.5),
    (2035, 7777, '2018-09-03', 88),
    (2035, 9999, default, null),
    (3755, 1111, default, null),
    (3755, 8888, default, null),
    (3755, 9999, '2017-09-01', 92);
    1
    2
    3
    4
    5
    6
    7
    8
    9
    10
    11
    12
    13
    14
    15
    16
    17
    18
    19
    20
    21
    22
    23
    24
    25
    26
    27
    28
    29
    30
    31
    32
    33
    34
    35
    36
    37
    38
    39
    40
    41
    42
    43
    44
    45
    46
    47
    48
    49
    50
    51
    52
    53
    54
    55
    56
    57
    58
    59
    60
    61
    62
    63
    64
    65
    66
    67
    68
    69
    70
    71
    72
    73
    74
    75
    76
    77
    78
    79
    80
    81
    82
    83
    84
    85
    86
    87
    88
    89
    90
    91
    -- 查询所有学生信息
    select * from tb_student;

    -- 查询所有课程名称及学分(投影和别名)
    select couname, coucredit from tb_course;
    select couname as 课程名称, coucredit as 学分 from tb_course;

    -- 查询所有学生的姓名和性别(条件运算)
    select stuname as 姓名, case stusex when 1 then '男' else '女' end as 性别 from tb_student;
    select stuname as 姓名, if(stusex, '男', '女') as 性别 from tb_student;

    -- 查询所有女学生的姓名和出生日期(筛选)
    select stuname, stubirth from tb_student where stusex=0;

    -- 查询所有80后学生的姓名、性别和出生日期(筛选)
    select stuname, stusex, stubirth from tb_student where stubirth>='1980-1-1' and stubirth<='1989-12-31';
    select stuname, stusex, stubirth from tb_student where stubirth between '1980-1-1' and '1989-12-31';

    -- 查询姓"杨"的学生姓名和性别(模糊)
    select stuname, stusex from tb_student where stuname like '杨%';

    -- 查询姓"杨"名字两个字的学生姓名和性别(模糊)
    select stuname, stusex from tb_student where stuname like '杨_';

    -- 查询姓"杨"名字三个字的学生姓名和性别(模糊)
    select stuname, stusex from tb_student where stuname like '杨__';

    -- 查询名字中有"不"字或"嫣"字的学生的姓名(模糊)
    select stuname, stusex from tb_student where stuname like '%不%' or stuname like '%嫣%';

    -- 查询没有录入家庭住址的学生姓名(空值)
    select stuname from tb_student where stuaddr is null;

    -- 查询录入了家庭住址的学生姓名(空值)
    select stuname from tb_student where stuaddr is not null;

    -- 查询学生选课的所有日期(去重)
    select distinct seldate from tb_record;

    -- 查询学生的家庭住址(去重)
    select distinct stuaddr from tb_student where stuaddr is not null;

    -- 查询男学生的姓名和生日按年龄从大到小排列(排序)
    select stuname as 姓名, datediff(curdate(), stubirth) div 365 as 年龄 from tb_student where stusex=1 order by 年龄 desc;

    -- 查询年龄最大的学生的出生日期(聚合函数)
    select min(stubirth) from tb_student;

    -- 查询年龄最小的学生的出生日期(聚合函数)
    select max(stubirth) from tb_student;

    -- 查询男女学生的人数(分组和聚合函数)
    select stusex, count(*) from tb_student group by stusex;

    -- 查询课程编号为1111的课程的平均成绩(筛选和聚合函数)
    select avg(score) from tb_record where cid=1111;

    -- 查询学号为1001的学生所有课程的平均分(筛选和聚合函数)
    select avg(score) from tb_record where sid=1001;

    -- 查询每个学生的学号和平均成绩(分组和聚合函数)
    select sid as 学号, avg(score) as 平均分 from tb_record group by sid;

    -- 查询平均成绩大于等于90分的学生的学号和平均成绩
    -- 分组以前的筛选使用where子句 / 分组以后的筛选使用having子句
    select sid as 学号, avg(score) as 平均分 from tb_record group by sid having 平均分>=90;

    -- 查询年龄最大的学生的姓名(子查询/嵌套的查询)
    select stuname from tb_student where stubirth=( select min(stubirth) from tb_student );

    -- 查询年龄最大的学生姓名和年龄(子查询+运算)
    select stuname as 姓名, datediff(curdate(), stubirth) div 365 as 年龄 from tb_student where stubirth=( select min(stubirth) from tb_student );

    -- 查询选了两门以上的课程的学生姓名(子查询/分组条件/集合运算)
    select stuname from tb_student where stuid in ( select stuid from tb_record group by stuid having count(stuid)>2 );

    -- 查询学生姓名、课程名称以及成绩(连接查询)
    select stuname, couname, score from tb_student t1, tb_course t2, tb_record t3 where stuid=sid and couid=cid and score is not null;

    -- 查询学生姓名、课程名称以及成绩按成绩从高到低查询第11-15条记录(内连接+分页)
    select stuname, couname, score from tb_student inner join tb_record on stuid=sid inner join tb_course on couid=cid where score is not null order by score desc limit 5 offset 10;

    select stuname, couname, score from tb_student inner join tb_record on stuid=sid inner join tb_course on couid=cid where score is not null order by score desc limit 10, 5;

    -- 查询选课学生的姓名和平均成绩(子查询和连接查询)
    select stuname, avgmark from tb_student, ( select sid, avg(score) as avgmark from tb_record group by sid ) temp where stuid=sid;

    select stuname, avgmark from tb_student inner join ( select sid, avg(score) as avgmark from tb_record group by sid ) temp on stuid=sid;

    -- 查询每个学生的姓名和选课数量(左外连接和子查询)
    select stuname, ifnull(total, 0) from tb_student left outer join ( select sid, count(sid) as total from tb_record group by sid ) temp on stuid=sid;

    上面的DML有几个地方需要加以说明:

    1. MySQL中支持多种类型的运算符,包括:算术运算符(+、-、*、/、%)、比较运算符(=、<>、<=>、<、<=、>、>=、BETWEEN…AND…、IN、IS NULL、IS NOT NULL、LIKE、RLIKE、REGEXP)、逻辑运算符(NOT、AND、OR、XOR)和位运算符(&、|、^、~、>>、<<),我们可以在DML中使用这些运算符处理数据。

    2. 在查询数据时,可以在SELECT语句及其子句(如WHERE子句、ORDER BY子句、HAVING子句等)中使用函数,这些函数包括字符串函数、数值函数、时间日期函数、流程函数等,如下面的表格所示。

      常用字符串函数。

      函数 功能
      CONCAT 将多个字符串连接成一个字符串
      FORMAT 将数值格式化成字符串并指定保留几位小数
      FROM_BASE64 / TO_BASE64 BASE64解码/编码
      BIN / OCT / HEX 将数值转换成二进制/八进制/十六进制字符串
      LOCATE 在字符串中查找一个子串的位置
      LEFT / RIGHT 返回一个字符串左边/右边指定长度的字符
      LENGTH / CHAR_LENGTH 返回字符串的长度以字节/字符为单位
      LOWER / UPPER 返回字符串的小写/大写形式
      LPAD / RPAD 如果字符串的长度不足,在字符串左边/右边填充指定的字符
      LTRIM / RTRIM 去掉字符串前面/后面的空格
      ORD / CHAR 返回字符对应的编码/返回编码对应的字符
      STRCMP 比较字符串,返回-1、0、1分别表示小于、等于、大于
      SUBSTRING 返回字符串指定范围的子串

      常用数值函数。

      函数 功能
      ABS 返回一个数的绝度值
      CEILING / FLOOR 返回一个数上取整/下取整的结果
      CONV 将一个数从一种进制转换成另一种进制
      CRC32 计算循环冗余校验码
      EXP / LOG / LOG2 / LOG10 计算指数/对数
      POW 求幂
      RAND 返回[0,1)范围的随机数
      ROUND 返回一个数四舍五入后的结果
      SQRT 返回一个数的平方根
      TRUNCATE 截断一个数到指定的精度
      SIN / COS / TAN / COT / ASIN / ACOS / ATAN 三角函数

      常用时间日期函数。

      函数 功能
      CURDATE / CURTIME / NOW 获取当前日期/时间/日期和时间
      ADDDATE / SUBDATE 将两个日期表达式相加/相减并返回结果
      DATE / TIME 从字符串中获取日期/时间
      YEAR / MONTH / DAY 从日期中获取年/月/日
      HOUR / MINUTE / SECOND 从时间中获取时/分/秒
      DATEDIFF / TIMEDIFF 返回两个时间日期表达式相差多少天/小时
      MAKEDATE / MAKETIME 制造一个日期/时间

      常用流程函数。

      函数 功能
      IF 根据条件是否成立返回不同的值
      IFNULL 如果为NULL则返回指定的值否则就返回本身
      NULLIF 两个表达式相等就返回NULL否则返回第一个表达式的值

      其他常用函数。

      函数 功能
      MD5 / SHA1 / SHA2 返回字符串对应的哈希摘要
      CHARSET / COLLATION 返回字符集/校对规则
      USER / CURRENT_USER 返回当前用户
      DATABASE 返回当前数据库名
      VERSION 返回当前数据库版本
      FOUND_ROWS / ROW_COUNT 返回查询到的行数/受影响的行数
      LAST_INSERT_ID 返回最后一个自增主键的值
      UUID / UUID_SHORT 返回全局唯一标识符
  3. DCL

    1
    2
    3
    4
    5
    6
    7
    8
    9
    10
    11
    12
    13
    14
    -- 创建可以远程登录的root账号并为其指定口令
    create user 'root'@'%' identified by '123456';

    -- 为远程登录的root账号授权操作所有数据库所有对象的所有权限并允许其将权限再次赋予其他用户
    grant all privileges on *.* to 'root'@'%' with grant option;

    -- 创建名为hellokitty的用户并为其指定口令
    create user 'hellokitty'@'%' identified by '123123';

    -- 将对school数据库所有对象的所有操作权限授予hellokitty
    grant all privileges on school.* to 'hellokitty'@'%';

    -- 召回hellokitty对school数据库所有对象的insert/delete/update权限
    revoke insert, delete, update on school.* from 'hellokitty'@'%';

    说明:创建一个可以允许任意主机登录并且具有超级管理员权限的用户在现实中并不是一个明智的决定,因为一旦该账号的口令泄露或者被破解,数据库将会面临灾难级的风险。

索引

索引是关系型数据库中用来提升查询性能最为重要的手段。关系型数据库中的索引就像一本书的目录,我们可以想象一下,如果要从一本书中找出某个知识点,但是这本书没有目录,这将是意见多么可怕的事情(我们估计得一篇一篇的翻下去,才能确定这个知识点到底在什么位置)。创建索引虽然会带来存储空间上的开销,就像一本书的目录会占用一部分的篇幅一样,但是在牺牲空间后换来的查询时间的减少也是非常显著的。

MySQL中,所有数据类型的列都可以被索引,常用的存储引擎InnoDB和MyISAM能支持每个表创建16个索引。InnoDB和MyISAM使用的索引其底层算法是B-tree(B树),B-tree是一种自平衡的树,类似于平衡二叉排序树,能够保持数据有序。这种数据结构能够让查找数据、顺序访问、插入数据及删除的操作都在对数时间内完成。

接下来我们通过一个简单的例子来说明索引的意义,比如我们要根据学生的姓名来查找学生,这个场景在实际开发中应该经常遇到,就跟通过商品名称查找商品道理是一样的。我们可以使用MySQL的explain关键字来查看SQL的执行计划。

1
explain select * from tb_student where stuname='林震南'\G
1
2
3
4
5
6
7
8
9
10
11
12
13
14
*************************** 1. row ***************************
id: 1
select_type: SIMPLE
table: tb_student
partitions: NULL
type: ALL
possible_keys: NULL
key: NULL
key_len: NULL
ref: NULL
rows: 11
filtered: 10.00
Extra: Using where
1 row in set, 1 warning (0.00 sec)

在上面的SQL执行计划中,有几项值得我们关注:

  1. type:MySQL在表中找到满足条件的行的方式,也称为访问类型,包括:ALL(全表扫描)、index(索引全扫描)、range(索引范围扫描)、ref(非唯一索引扫描)、eq_ref(唯一索引扫描)、const/system、NULL。在所有的访问类型中,很显然ALL是性能最差的,它代表了全表扫描是指要扫描表中的每一行才能找到匹配的行。
  2. possible_keys:MySQL可以选择的索引,但是有可能不会使用
  3. key:MySQL真正使用的索引。
  4. rows:执行查询需要扫描的行数,这是一个预估值

从上面的执行计划可以看出,当我们通过学生名字查询学生时实际上是进行了全表扫描,不言而喻这个查询性能肯定是非常糟糕的,尤其是在表中的行很多的时候。如果我们需要经常通过学生姓名来查询学生,那么就应该在学生姓名对应的列上创建索引,通过索引来加速查询。

1
create index idx_student_name on tb_student(stuname);

再次查看刚才的SQL对应的执行计划。

1
explain select * from tb_student where stuname='林震南'\G
1
2
3
4
5
6
7
8
9
10
11
12
13
14
*************************** 1. row ***************************
id: 1
select_type: SIMPLE
table: tb_student
partitions: NULL
type: ref
possible_keys: idx_student_name
key: idx_student_name
key_len: 62
ref: const
rows: 1
filtered: 100.00
Extra: NULL
1 row in set, 1 warning (0.00 sec)

可以注意到,在对学生姓名创建索引后,刚才的查询已经不是全表扫描而是基于索引的查询,而且扫描的行只有唯一的一行,这显然大大的提升了查询的性能。MySQL中还允许创建前缀索引,即对索引字段的前N个字符创建索引,这样的话可以减少索引占用的空间(但节省了空间很有可能会浪费时间,时间和空间是不可调和的矛盾),如下所示。

1
create index idx_student_name_1 on tb_student(stuname(1));

上面的索引相当于是根据学生姓名的第一个字来创建的索引,我们再看看SQL执行计划。

1
explain select * from tb_student where stuname='林震南'\G
1
2
3
4
5
6
7
8
9
10
11
12
13
14
*************************** 1. row ***************************
id: 1
select_type: SIMPLE
table: tb_student
partitions: NULL
type: ref
possible_keys: idx_student_name
key: idx_student_name
key_len: 5
ref: const
rows: 2
filtered: 100.00
Extra: Using where
1 row in set, 1 warning (0.00 sec)

不知道大家是否注意到,这一次扫描的行变成了2行,因为学生表中有两个姓“林”的学生,我们只用姓名的第一个字作为索引的话,在查询时通过索引就会找到这两行。

如果要删除索引,可以使用下面的SQL。

1
alter table tb_student drop index idx_student_name;

或者

1
drop index idx_student_name on tb_student;

我们简单的为大家总结一下索引的设计原则:

  1. 最适合索引的列是出现在WHERE子句和连接子句中的列。
  2. 索引列的基数越大(取值多重复值少),索引的效果就越好。
  3. 使用前缀索引可以减少索引占用的空间,内存中可以缓存更多的索引。
  4. 索引不是越多越好,虽然索引加速了读操作(查询),但是写操作(增、删、改)都会变得更慢,因为数据的变化会导致索引的更新,就如同书籍章节的增删需要更新目录一样。
  5. 使用InnoDB存储引擎时,表的普通索引都会保存主键的值,所以主键要尽可能选择较短的数据类型,这样可以有效的减少索引占用的空间,利用提升索引的缓存效果。

最后,还有一点需要说明,InnoDB使用的B-tree索引,数值类型的列除了等值判断时索引会生效之外,使用>、<、>=、<=、BETWEEN…AND… 、<>时,索引仍然生效;对于字符串类型的列,如果使用不以通配符开头的模糊查询,索引也是起作用的,但是其他的情况会导致索引失效,这就意味着很有可能会做全表查询。

视图

视图是关系型数据库中将一组查询指令构成的结果集组合成可查询的数据表的对象。简单的说,视图就是虚拟的表,但与数据表不同的是,数据表是一种实体结构,而视图是一种虚拟结构,你也可以将视图理解为保存在数据库中被赋予名字的SQL语句。

使用视图可以获得以下好处:

  1. 可以将实体数据表隐藏起来,让外部程序无法得知实际的数据结构,让访问者可以使用表的组成部分而不是整个表,降低数据库被攻击的风险。
  2. 在大多数的情况下视图是只读的(更新视图的操作通常都有诸多的限制),外部程序无法直接透过视图修改数据。
  3. 重用SQL语句,将高度复杂的查询包装在视图表中,直接访问该视图即可取出需要的数据;也可以将视图视为数据表进行连接查询。
  4. 视图可以返回与实体数据表不同格式的数据,

创建视图。

1
2
3
4
5
6
7
8
9
create view vw_score 
as
select sid, round(avg(score), 1) as avgscore from tb_record group by sid;

create view vw_student_score
as
select stuname, avgscore
from tb_student, vw_score
where stuid=sid;

提示:因为视图不包含数据,所以每次使用视图时,都必须执行查询以获得数据,如果你使用了连接查询、嵌套查询创建了较为复杂的视图,你可能会发现查询性能下降得很厉害。因此,在使用复杂的视图前,应该进行测试以确保其性能能够满足应用的需求。

使用视图。

1
select stuname, avgscore from vw_student_score order by avgscore desc;
1
2
3
4
5
6
7
8
9
10
11
+--------------+----------+
| stuname | avgscore |
+--------------+----------+
| 杨过 | 95.6 |
| 任我行 | 53.5 |
| 王语嫣 | 84.3 |
| 纪嫣然 | 73.8 |
| 岳不群 | 78.0 |
| 东方不败 | 88.0 |
| 项少龙 | 92.0 |
+--------------+----------+

既然视图是一张虚拟的表,那么视图的中的数据可以更新吗?视图的可更新性要视具体情况而定,以下类型的视图是不能更新的:

  1. 使用了聚合函数(SUM、MIN、MAX、AVG、COUNT等)、DISTINCT、GROUP BY、HAVING、UNION或者UNION ALL的视图。
  2. SELECT中包含了子查询的视图。
  3. FROM子句中包含了一个不能更新的视图的视图。
  4. WHERE子句的子查询引用了FROM子句中的表的视图。

删除视图。

1
drop view vw_student_score;

说明:如果希望更新视图,可以先用上面的命令删除视图,也可以通过create or replace view来更新视图。

视图的规则和限制。

  1. 视图可以嵌套,可以利用从其他视图中检索的数据来构造一个新的视图。视图也可以和表一起使用。
  2. 创建视图时可以使用order by子句,但如果从视图中检索数据时也使用了order by,那么该视图中原先的order by会被覆盖。
  3. 视图无法使用索引,也不会激发触发器(实际开发中因为性能等各方面的考虑,通常不建议使用触发器,所以我们也不对这个概念进行介绍)的执行。

存储过程

存储过程是事先编译好存储在数据库中的一组SQL的集合,调用存储过程可以简化应用程序开发人员的工作,减少与数据库服务器之间的通信,对于提升数据操作的性能也是有帮助的。其实迄今为止,我们使用的SQL语句都是针对一个或多个表的单条语句,但在实际开发中经常会遇到某个操作需要多条SQL语句才能完成的情况。例如,电商网站在受理用户订单时,需要做以下一系列的处理。

  1. 通过查询来核对库存中是否有对应的物品以及库存是否充足。
  2. 如果库存有物品,需要锁定库存以确保这些物品不再卖给别人, 并且要减少可用的物品数量以反映正确的库存量。
  3. 如果库存不足,可能需要进一步与供应商进行交互或者至少产生一条系统提示消息。
  4. 不管受理订单是否成功,都需要产生流水记录,而且需要给对应的用户产生一条通知信息。

我们可以通过存储过程将复杂的操作封装起来,这样不仅有助于保证数据的一致性,而且将来如果业务发生了变动,只需要调整和修改存储过程即可。对于调用存储过程的用户来说,存储过程并没有暴露数据表的细节,而且执行存储过程比一条条的执行一组SQL要快得多。

下面的存储过程实现了查询某门课程的最高分、最低分和平均分。

1
2
3
4
5
6
7
8
9
10
11
12
13
delimiter $$

create procedure sp_get_score(courseId int,
out maxScore decimal(4,1),
out minScore decimal(4,1),
out avgScore decimal(4,1))
begin
select max(score) into maxScore from tb_record where cid=courseId;
select min(score) into minScore from tb_record where cid=courseId;
select avg(score) into avgScore from tb_record where cid=courseId;
end $$

delimiter ;

说明:在定义存储过程时,因为可能需要书写多条SQL,而分隔这些SQL需要使用分号作为分隔符,如果这个时候,仍然用分号表示整段代码结束,那么定义存储过程的SQL就会出现错误,所以上面我们用delimiter $$将整段代码结束的标记定义为$$,那么代码中的分号将不再表示整段代码的结束,需要马上执行,整段代码在遇到end $$时才输入完成并执行。在定义完存储过程后,通过delimiter ;将结束符重新改回成分号。

上面定义的存储过程有四个参数,其中第一个参数是输入参数,代表课程的编号,后面的参数都是输出参数,因为存储过程不能定义返回值,只能通过输出参数将执行结果带出,定义输出参数的关键字是out,默认情况下参数都是输入参数。

调用存储过程。

1
call sp_get_score(1111, @a, @b, @c);

获取输出参数的值。

1
select @a as 最高分, @b as 最低分, @c as 平均分;

删除存储过程。

1
drop procedure sp_get_score;

在存储过程中,我们可以定义变量、条件,可以使用分支和循环语句,可以通过游标操作查询结果,还可以使用事件调度器,这些内容我们暂时不在此处进行介绍。虽然我们说了很多存储过程的好处,但是在实际开发中,如果过度的使用存储过程,将大量复杂的运算放到存储过程中,也会导致占用数据库服务器的CPU资源,造成数据库服务器承受巨大的压力。为此,我们一般会将复杂的运算和处理交给应用服务器,因为很容易部署多台应用服务器来分摊这些压力。

几个重要的概念

范式理论 - 设计二维表的指导思想

  1. 第一范式:数据表的每个列的值域都是由原子值组成的,不能够再分割。
  2. 第二范式:数据表里的所有数据都要和该数据表的键(主键与候选键)有完全依赖关系。
  3. 第三范式:所有非键属性都只和候选键有相关性,也就是说非键属性之间应该是独立无关的。

数据完整性

  1. 实体完整性 - 每个实体都是独一无二的

    • 主键(primary key) / 唯一约束 / 唯一索引(unique)
  2. 引用完整性(参照完整性)- 关系中不允许引用不存在的实体

    • 外键(foreign key)
  3. 域完整性 - 数据是有效的

    • 数据类型及长度

    • 非空约束(not null)

    • 默认值约束(default)

    • 检查约束(check)

      说明:在MySQL数据库中,检查约束并不起作用。

数据一致性

  1. 事务:一系列对数据库进行读/写的操作,这些操作要么全都成功,要么全都失败。

  2. 事务的ACID特性

    • 原子性:事务作为一个整体被执行,包含在其中的对数据库的操作要么全部被执行,要么都不执行
    • 一致性:事务应确保数据库的状态从一个一致状态转变为另一个一致状态
    • 隔离性:多个事务并发执行时,一个事务的执行不应影响其他事务的执行
    • 持久性:已被提交的事务对数据库的修改应该永久保存在数据库中
  3. MySQL中的事务操作

    • 开启事务环境

      1
      start transaction

      1
      begin
    • 提交事务

      1
      commit
    • 回滚事务

      1
      rollback

其他内容

大家应该能够想到,关于MySQL的知识肯定远远不止上面列出的这些,比如MySQL的性能优化、管理和维护MySQL的相关工具、MySQL数据的备份和恢复、监控MySQL、部署高可用架构等问题我们在这里都没有进行讨论。当然,这些内容也都是跟项目开发密切相关的,我们就留到后续的章节中再续点进行讲解。

Python数据库编程

我们用如下所示的数据库来演示在Python中如何访问MySQL数据库。

1
2
3
4
5
6
7
8
9
10
11
12
13
14
15
16
17
18
19
20
21
22
23
24
25
26
27
28
29
30
31
32
33
34
35
36
37
38
39
40
41
42
43
44
45
46
47
48
49
50
51
drop database if exists hrs;
create database hrs default charset utf8;

use hrs;

drop table if exists tb_emp;
drop table if exists tb_dept;

create table tb_dept
(
dno int not null comment '编号',
dname varchar(10) not null comment '名称',
dloc varchar(20) not null comment '所在地',
primary key (dno)
);

insert into tb_dept values
(10, '会计部', '北京'),
(20, '研发部', '成都'),
(30, '销售部', '重庆'),
(40, '运维部', '深圳');

create table tb_emp
(
eno int not null comment '员工编号',
ename varchar(20) not null comment '员工姓名',
job varchar(20) not null comment '员工职位',
mgr int comment '主管编号',
sal int not null comment '员工月薪',
comm int comment '每月补贴',
dno int comment '所在部门编号',
primary key (eno)
);

alter table tb_emp add constraint fk_emp_dno foreign key (dno) references tb_dept (dno);

insert into tb_emp values
(7800, '张三丰', '总裁', null, 9000, 1200, 20),
(2056, '乔峰', '分析师', 7800, 5000, 1500, 20),
(3088, '李莫愁', '设计师', 2056, 3500, 800, 20),
(3211, '张无忌', '程序员', 2056, 3200, null, 20),
(3233, '丘处机', '程序员', 2056, 3400, null, 20),
(3251, '张翠山', '程序员', 2056, 4000, null, 20),
(5566, '宋远桥', '会计师', 7800, 4000, 1000, 10),
(5234, '郭靖', '出纳', 5566, 2000, null, 10),
(3344, '黄蓉', '销售主管', 7800, 3000, 800, 30),
(1359, '胡一刀', '销售员', 3344, 1800, 200, 30),
(4466, '苗人凤', '销售员', 3344, 2500, null, 30),
(3244, '欧阳锋', '程序员', 3088, 3200, null, 20),
(3577, '杨过', '会计', 5566, 2200, null, 10),
(3588, '朱九真', '会计', 5566, 2500, null, 10);

在Python 3中,我们通常使用纯Python的三方库PyMySQL来访问MySQL数据库,它应该是目前Python操作MySQL数据库最好的选择。

  1. 安装PyMySQL。

    1
    pip install pymysql
  2. 添加一个部门。

    1
    2
    3
    4
    5
    6
    7
    8
    9
    10
    11
    12
    13
    14
    15
    16
    17
    18
    19
    20
    21
    22
    23
    24
    25
    26
    27
    28
    29
    30
    import pymysql


    def main():
    no = int(input('编号: '))
    name = input('名字: ')
    loc = input('所在地: ')
    # 1. 创建数据库连接对象
    con = pymysql.connect(host='localhost', port=3306,
    database='hrs', charset='utf8',
    user='root', password='123456')
    try:
    # 2. 通过连接对象获取游标
    with con.cursor() as cursor:
    # 3. 通过游标执行SQL并获得执行结果
    result = cursor.execute(
    'insert into tb_dept values (%s, %s, %s)',
    (no, name, loc)
    )
    if result == 1:
    print('添加成功!')
    # 4. 操作成功提交事务
    con.commit()
    finally:
    # 5. 关闭连接释放资源
    con.close()


    if __name__ == '__main__':
    main()
  3. 删除一个部门。

    1
    2
    3
    4
    5
    6
    7
    8
    9
    10
    11
    12
    13
    14
    15
    16
    17
    18
    19
    20
    21
    22
    23
    import pymysql


    def main():
    no = int(input('编号: '))
    con = pymysql.connect(host='localhost', port=3306,
    database='hrs', charset='utf8',
    user='root', password='123456',
    autocommit=True)
    try:
    with con.cursor() as cursor:
    result = cursor.execute(
    'delete from tb_dept where dno=%s',
    (no, )
    )
    if result == 1:
    print('删除成功!')
    finally:
    con.close()


    if __name__ == '__main__':
    main()

    说明:如果不希望每次SQL操作之后手动提交或回滚事务,可以像上面的代码那样,在创建连接的时候多加一个名为autocommit的参数并将它的值设置为True,表示每次执行SQL之后自动提交。如果程序中不需要使用事务环境也不希望手动的提交或回滚就可以这么做。

  4. 更新一个部门。

    1
    2
    3
    4
    5
    6
    7
    8
    9
    10
    11
    12
    13
    14
    15
    16
    17
    18
    19
    20
    21
    22
    23
    24
    25
    import pymysql


    def main():
    no = int(input('编号: '))
    name = input('名字: ')
    loc = input('所在地: ')
    con = pymysql.connect(host='localhost', port=3306,
    database='hrs', charset='utf8',
    user='root', password='123456',
    autocommit=True)
    try:
    with con.cursor() as cursor:
    result = cursor.execute(
    'update tb_dept set dname=%s, dloc=%s where dno=%s',
    (name, loc, no)
    )
    if result == 1:
    print('更新成功!')
    finally:
    con.close()


    if __name__ == '__main__':
    main()
  5. 查询所有部门。

    1
    2
    3
    4
    5
    6
    7
    8
    9
    10
    11
    12
    13
    14
    15
    16
    17
    18
    19
    20
    21
    22
    23
    24
    import pymysql
    from pymysql.cursors import DictCursor


    def main():
    con = pymysql.connect(host='localhost', port=3306,
    database='hrs', charset='utf8',
    user='root', password='123456')
    try:
    with con.cursor(cursor=DictCursor) as cursor:
    cursor.execute('select dno as no, dname as name, dloc as loc from tb_dept')
    results = cursor.fetchall()
    print(results)
    print('编号\t名称\t\t所在地')
    for dept in results:
    print(dept['no'], end='\t')
    print(dept['name'], end='\t')
    print(dept['loc'])
    finally:
    con.close()


    if __name__ == '__main__':
    main()
  6. 分页查询员工信息。

    1
    2
    3
    4
    5
    6
    7
    8
    9
    10
    11
    12
    13
    14
    15
    16
    17
    18
    19
    20
    21
    22
    23
    24
    25
    26
    27
    28
    29
    30
    31
    32
    33
    34
    35
    36
    37
    import pymysql
    from pymysql.cursors import DictCursor


    class Emp(object):

    def __init__(self, no, name, job, sal):
    self.no = no
    self.name = name
    self.job = job
    self.sal = sal

    def __str__(self):
    return f'\n编号:{self.no}\n姓名:{self.name}\n职位:{self.job}\n月薪:{self.sal}\n'


    def main():
    page = int(input('页码: '))
    size = int(input('大小: '))
    con = pymysql.connect(host='localhost', port=3306,
    database='hrs', charset='utf8',
    user='root', password='123456')
    try:
    with con.cursor() as cursor:
    cursor.execute(
    'select eno as no, ename as name, job, sal from tb_emp limit %s,%s',
    ((page - 1) * size, size)
    )
    for emp_tuple in cursor.fetchall():
    emp = Emp(*emp_tuple)
    print(emp)
    finally:
    con.close()


    if __name__ == '__main__':
    main()

算术运算符

+
-
*
/
%  取模 - 返回除法的余数
** 幂 - 返回x的y次幂
// 取整除 - 返回商的整数部分(向下取整)

比较运算符

==
!=或<>
>
<
>=
<=

赋值运算符

=
+=
-=
*=
/=
%=
**=
//=

位运算符(二进制)

逻辑运算符

and
or
not

成员运算符

in
not in

身份运算符

is
is not

条件语句

if 判断条件1.1 and 判断条件1.2`:`
    执行语句1……
elif 判断条件2.1 or 判断条件2.2`:`
    执行语句2……
elif (num >= 0 and num <= 5) or (num >= 10 and num <= 15)`:`
    执行语句3……
else`:` 执行语句4……  #同一行的位置上使用if条件判断语句

循环for

for iterating_var in sequence:
    statements(s)

循环嵌套for

for iterating_var in sequence:
    for iterating_var in sequence:
       statements(s)
    statements(s)

break,continue,pass

# 跳出最近的一层循环
$ break

# 跳过本次循环,继续下一次循环
$ continue

# 占位符,后面的还运行
$ pass

玩转Linux操作系统

说明:本文中对Linux命令的讲解都是基于名为CentOS的Linux发行版本,我自己使用的是阿里云服务器,系统版本为CentOS Linux release 7.6.1810。不同的Linux发行版本在Shell命令和工具程序上会有一些差别,但是这些差别是很小的。

操作系统发展史

只有硬件没有软件的计算机系统被称之为“裸机”,我们很难用“裸机”来完成计算机日常的工作(如存储和运算),所以必须用特定的软件来控制硬件的工作。最靠近计算机硬件的软件是系统软件,其中最为重要的就是“操作系统”。“操作系统”是控制和管理整个计算机硬件和软件资源、实现资源分配和任务调配、为系统用户以及其他软件提供接口和环境的程序的集合。

没有操作系统(手工操作)

在计算机诞生之初没有操作系统的年代,人们先把程序纸带(或卡片)装上计算机,然后启动输入机把程序送入计算机,接着通过控制台开关启动程序运行。当程序执行完毕,打印机输出计算的结果,用户卸下并取走纸带(或卡片)。第二个用户上机,重复同样的步骤。在整个过程中用户独占机器,CPU等待手工操作,资源利用率极低。

批处理系统

首先启动计算机上的一个监督程序,在监督程序的控制下,计算机能够自动的、成批的处理一个或多个用户的作业。完成一批作业后,监督程度又从输入机读取作业存入磁带机。按照上面的步骤重复处理任务。监督程序不停的处理各个作业,实现了作业的自动转接,减少了作业的建立时间和手工操作时间,提高了计算机资源的利用率。 批处理系统又可以分为单道批处理系统、多道批处理系统、联机批处理系统、脱机批处理系统。

分时系统和实时系统

分时系统是把处理器的运行时间分成很短的时间片,按时间片轮流把处理机分配给各联机作业使用。 若某个作业在分配给它的时间片内不能完成其计算,则该作业暂时中断,把处理机让给另一作业使用,等待下一轮调度时再继续其运行。由于计算机速度很快,作业运行轮转得很快,给每个用户的感觉是他独占了一台计算机。而每个用户可以通过自己的终端向系统发出各种操作控制命令,在充分的人机交互情况下,完成作业的运行。为了解决分时系统不能及时响应用户指令的情况,又出现了能够在在严格的时间范围内完成事件处理,及时响应随机外部事件的实时系统。

通用操作系统

  1. 1960s:IBM的System/360系列的机器有了统一的操作系统OS/360。

  2. 1965年:AT&T的贝尔实验室加入GE和MIT的合作计划开始开发MULTICS。

  3. 1969年:MULTICS项目失败,Ken Tompson赋闲在家,为了玩“Space Travel”游戏用汇编语言在当时已经被淘汰的PDP-7上开发了Unics。

    注:很难想象,Unix这么伟大的系统,居然是一个赋闲在家的程序员(关键是老婆回娘家还带上了孩子)在一台被淘汰的设备上为了玩游戏开发出来的。

  4. 1970年~1971年:Ken Tompson和Dennis Ritchie用B语言在PDP-11上重写了Unics,并在Brian Kernighan的建议下将其更名为Unix。

  5. 1972年~1973年:Dennis Ritchie发明了C语言来取代可移植性较差的B语言,并开启了用C语言重写Unix的工作。

  6. 1974年:Unix推出了里程碑意义的第5版,几乎完全用C语言来实现。

  7. 1979年:从Unix第7版开始,AT&T发布新的使用条款,将Unix私有化。

  8. 1987年:Andrew S. Tanenbaum教授为了能在课堂上为学生讲解操作系统运作的细节,决定在不使用任何AT&T的源代码前提下,自行开发与Unix兼容的操作系统以避免版权上的争议,该系统被命名为Minix。

  9. 1991年:Linus Torvalds就读于芬兰赫尔辛基大学期间,尝试在Minix上做一些开发工作,但因为Minix只是作为教学用途的操作系统,功能并不强大,为了方便在学校的新闻组和邮件系统中读写和下载文件,Linus编写了磁盘驱动程序和文件系统,这些东西形成了Linux系统内核的雏形。

下图是Unix操作系统家族的图谱。

Linux概述

Linux是一个通用操作系统。一个操作系统要负责任务调度、内存分配、处理外围设备I/O等操作。操作系统通常由内核(运行其他程序,管理像磁盘、打印机等硬件设备的核心程序)和系统程序(设备驱动、底层库、shell、服务程序等)两部分组成。

Linux内核是芬兰人Linus Torvalds开发的,于1991年9月发布。而Linux操作系统作为Internet时代的产物,它是由全世界许多开发者共同合作开发的,是一个自由的操作系统(注意自由和免费并不是同一个概念,想了解二者的差别可以点击这里)。

Linux系统优点

  1. 通用操作系统,不跟特定的硬件绑定。
  2. 用C语言编写,可移植性强,有内核编程接口。
  3. 支持多用户和多任务,支持安全的分层文件系统。
  4. 大量的实用程序,完善的网络功能以及强大的支持文档。
  5. 可靠的安全性和良好的稳定性,对开发者更友好。

Linux系统发行版本

  1. Redhat
  2. Ubuntu
  3. CentOS
  4. Fedora
  5. Debian
  6. openSUSE

基础命令

Linux系统的命令通常都是如下所示的格式:

1
命令名称 [命名参数] [命令对象]
  1. 获取登录信息 - w / who / last/ lastb

    1
    2
    3
    4
    5
    6
    7
    8
    9
    10
    11
    12
    13
    14
    15
    16
    17
    18
    19
    20
    [root ~]# w
    23:31:16 up 12:16, 2 users, load average: 0.00, 0.01, 0.05
    USER TTY FROM LOGIN@ IDLE JCPU PCPU WHAT
    root pts/0 182.139.66.250 23:03 4.00s 0.02s 0.00s w
    jackfrue pts/1 182.139.66.250 23:26 3:56 0.00s 0.00s -bash
    [root ~]# who
    root pts/0 2018-04-12 23:03 (182.139.66.250)
    jackfrued pts/1 2018-04-12 23:26 (182.139.66.250)
    [root ~]# who am i
    root pts/0 2018-04-12 23:03 (182.139.66.250)
    [root ~]# who mom likes
    root pts/0 2018-04-12 23:03 (182.139.66.250)
    [root ~]# last
    root pts/0 117.136.63.184 Sun May 26 18:57 still logged in
    reboot system boot 3.10.0-957.10.1. Mon May 27 02:52 - 19:10 (-7:-42)
    root pts/4 117.136.63.184 Sun May 26 18:51 - crash (08:01)
    root pts/4 117.136.63.184 Sun May 26 18:49 - 18:49 (00:00)
    root pts/3 117.136.63.183 Sun May 26 18:35 - crash (08:17)
    root pts/2 117.136.63.183 Sun May 26 18:34 - crash (08:17)
    root pts/0 117.136.63.183 Sun May 26 18:10 - crash (08:42)
  2. 查看自己使用的Shell - ps

    Shell也被称为“壳”或“壳程序”,它是用户与操作系统内核交流的翻译官,简单的说就是人与计算机交互的界面和接口。目前很多Linux系统默认的Shell都是bash(Bourne Again SHell),因为它可以使用tab键进行命令和路径补全、可以保存历史命令、可以方便的配置环境变量以及执行批处理操作。

    1
    2
    3
    4
    [root@izwz97tbgo9lkabnat2lo8z ~]# ps
    PID TTY TIME CMD
    3531 pts/0 00:00:00 bash
    3553 pts/0 00:00:00 ps
  3. 查看命令的说明和位置 - whatis / which / whereis

    1
    2
    3
    4
    5
    6
    7
    8
    9
    10
    11
    12
    [root ~]# whatis ps
    ps (1) - report a snapshot of the current processes.
    [root ~]# whatis python
    python (1) - an interpreted, interactive, object-oriented programming language
    [root ~]# whereis ps
    ps: /usr/bin/ps /usr/share/man/man1/ps.1.gz
    [root ~]# whereis python
    python: /usr/bin/python /usr/bin/python2.7 /usr/lib/python2.7 /usr/lib64/python2.7 /etc/python /usr/include/python2.7 /usr/share/man/man1/python.1.gz
    [root ~]# which ps
    /usr/bin/ps
    [root ~]# which python
    /usr/bin/python
  4. 清除屏幕上显示的内容 - clear

  5. 查看帮助文档 - man / info / help / apropos

    1
    2
    3
    4
    5
    6
    7
    8
    9
    10
    11
    12
    13
    14
    15
    [root@izwz97tbgo9lkabnat2lo8z ~]# ps --help
    Usage:
    ps [options]
    Try 'ps --help <simple|list|output|threads|misc|all>'
    or 'ps --help <s|l|o|t|m|a>'
    for additional help text.
    For more details see ps(1).
    [root@izwz97tbgo9lkabnat2lo8z ~]# man ps
    PS(1) User Commands PS(1)
    NAME
    ps - report a snapshot of the current processes.
    SYNOPSIS
    ps [options]
    DESCRIPTION
    ...
  6. 查看系统和主机名 - uname / hostname

    1
    2
    3
    4
    5
    6
    [root@izwz97tbgo9lkabnat2lo8z ~]# uname
    Linux
    [root@izwz97tbgo9lkabnat2lo8z ~]# hostname
    izwz97tbgo9lkabnat2lo8z
    [root@iZwz97tbgo9lkabnat2lo8Z ~]# cat /etc/centos-release
    CentOS Linux release 7.6.1810 (Core)

    说明:cat是连接文件内容并打印到标准输出的命令,后面会讲到该命令;/etc是Linux系统上的一个非常重要的目录,它保存了很多的配置文件;centos-release是该目录下的一个文件,因为我自己使用的Linux发行版本是CentOS 7.6,因此这里会有一个这样的文件。

  7. 时间和日期 - date / cal

    1
    2
    3
    4
    5
    6
    7
    8
    9
    10
    11
    12
    13
    14
    15
    16
    17
    18
    [root@iZwz97tbgo9lkabnat2lo8Z ~]# date
    Wed Jun 20 12:53:19 CST 2018
    [root@iZwz97tbgo9lkabnat2lo8Z ~]# cal
    June 2018
    Su Mo Tu We Th Fr Sa
    1 2
    3 4 5 6 7 8 9
    10 11 12 13 14 15 16
    17 18 19 20 21 22 23
    24 25 26 27 28 29 30
    [root@iZwz97tbgo9lkabnat2lo8Z ~]# cal 5 2017
    May 2017
    Su Mo Tu We Th Fr Sa
    1 2 3 4 5 6
    7 8 9 10 11 12 13
    14 15 16 17 18 19 20
    21 22 23 24 25 26 27
    28 29 30 31
  8. 重启和关机 - reboot / shutdown

    1
    2
    3
    4
    5
    6
    7
    8
    9
    10
    11
    12
    13
    14
    15
    16
    17
    18
    [root ~]# shutdown -h +5
    Shutdown scheduled for Sun 2019-05-26 19:34:27 CST, use 'shutdown -c' to cancel.
    [root ~]#
    Broadcast message from root (Sun 2019-05-26 19:29:27 CST):

    The system is going down for power-off at Sun 2019-05-26 19:34:27 CST!
    [root ~]# shutdown -c

    Broadcast message from root (Sun 2019-05-26 19:30:22 CST):

    The system shutdown has been cancelled at Sun 2019-05-26 19:31:22 CST!
    [root ~]# shutdown -r 23:58
    Shutdown scheduled for Sun 2019-05-26 23:58:00 CST, use 'shutdown -c' to cancel.
    [root ~]# shutdown -c

    Broadcast message from root (Sun 2019-05-26 19:31:06 CST):

    The system shutdown has been cancelled at Sun 2019-05-26 19:32:06 CST!

    说明:在执行shutdown命令时会向登录系统的用户发出警告,可以在命令后面跟上警告消息来替换默认的警告消息,也可以在-h参数后通过now来表示立刻关机。

  9. 退出登录 - exit / logout

  10. 查看历史命令 - history

    1
    2
    3
    4
    5
    6
    7
    [root@iZwz97tbgo9lkabnat2lo8Z ~]# history
    ...
    452 ls
    453 cd Python-3.6.5/
    454 clear
    455 history
    [root@iZwz97tbgo9lkabnat2lo8Z ~]# !454

    说明:查看到历史命令之后,可以用!历史命令编号来重新执行该命令;通过history -c可以清除历史命令。

实用程序

文件和文件夹操作

  1. 创建/删除空目录 - mkdir / rmdir

    1
    2
    3
    [root ~]# mkdir abc
    [root ~]# mkdir -p xyz/abc
    [root ~]# rmdir abc
  2. 创建/删除文件 - touch / rm

    1
    2
    3
    4
    5
    [root ~]# touch readme.txt
    [root ~]# touch error.txt
    [root ~]# rm error.txt
    rm: remove regular empty file ‘error.txt’? y
    [root ~]# rm -rf xyz
    • touch命令用于创建空白文件或修改文件时间。在Linux系统中一个文件有三种时间:
      • 更改内容的时间 - mtime。
      • 更改权限的时间 - ctime。
      • 最后访问时间 - atime。
    • rm的几个重要参数:
      • -i:交互式删除,每个删除项都会进行询问。
      • -r:删除目录并递归的删除目录中的文件和目录。
      • -f:强制删除,忽略不存在的文件,没有任何提示。
  3. 切换和查看当前工作目录 - cd / pwd

    说明:cd命令后面可以跟相对路径(以当前路径作为参照)或绝对路径(以/开头)来切换到指定的目录,也可以用cd ..来返回上一级目录。请大家想一想,如果要返回到上上一级目录应该给cd命令加上什么样的参数呢?

  4. 查看目录内容 - ls

    • -l:以长格式查看文件和目录。
    • -a:显示以点开头的文件和目录(隐藏文件)。
    • -R:遇到目录要进行递归展开(继续列出目录下面的文件和目录)。
    • -d:只列出目录,不列出其他内容。
    • -S / -t:按大小/时间排序。
  5. 查看文件内容 - cat / tac / head / tail / more / less / rev / od

    1
    2
    3
    4
    5
    6
    7
    8
    9
    10
    11
    12
    13
    14
    15
    16
    17
    18
    19
    20
    21
    22
    23
    24
    25
    26
    27
    28
    [root ~]# wget http://www.sohu.com/ -O sohu.html
    --2018-06-20 18:42:34-- http://www.sohu.com/
    Resolving www.sohu.com (www.sohu.com)... 14.18.240.6
    Connecting to www.sohu.com (www.sohu.com)|14.18.240.6|:80... connected.
    HTTP request sent, awaiting response... 200 OK
    Length: 212527 (208K) [text/html]
    Saving to: ‘sohu.html’
    100%[==================================================>] 212,527 --.-K/s in 0.03s
    2018-06-20 18:42:34 (7.48 MB/s) - ‘sohu.html’ saved [212527/212527]
    [root ~]# cat sohu.html
    ...
    [root ~]# head -10 sohu.html
    <!DOCTYPE html>
    <html>
    <head>
    <title>搜狐</title>
    <meta name="Keywords" content="搜狐,门户网站,新媒体,网络媒体,新闻,财经,体育,娱乐,时尚,汽车,房产,科技,图片,论坛,微博,博客,视频,电影,电视剧"/>
    <meta name="Description" content="搜狐网为用户提供24小时不间断的最新资讯,及搜索、邮件等网络服务。内容包括全球热点事件、突发新闻、时事评论、热播影视剧、体育赛事、行业动态、生活服务信息,以及论坛、博客、微博、我的搜狐等互动空间。" />
    <meta name="shenma-site-verification" content="1237e4d02a3d8d73e96cbd97b699e9c3_1504254750">
    <meta charset="utf-8"/>
    <meta http-equiv="X-UA-Compatible" content="IE=Edge,chrome=1"/>
    [root ~]# tail -2 sohu.html
    </body>
    </html>
    [root ~]# less sohu.html
    ...
    [root ~]# cat -n sohu.html | more
    ...

    说明:上面用到了一个名为wget的命令,它是一个网络下载器程序,可以从指定的URL下载资源。

  6. 拷贝/移动文件 - cp / mv

    1
    2
    3
    4
    5
    6
    7
    8
    [root ~]# mkdir backup
    [root ~]# cp sohu.html backup/
    [root ~]# cd backup
    [root backup]# ls
    sohu.html
    [root backup]# mv sohu.html sohu_index.html
    [root backup]# ls
    sohu_index.html
  7. 文件重命名 - rename

    1
    [root@iZwz97tbgo9lkabnat2lo8Z ~]# rename .htm .html *.htm
  8. 查找文件和查找内容 - find / grep

    1
    2
    3
    4
    5
    6
    7
    8
    9
    10
    11
    12
    13
    14
    15
    16
    17
    [root@iZwz97tbgo9lkabnat2lo8Z ~]# find / -name "*.html"
    /root/sohu.html
    /root/backup/sohu_index.html
    [root@izwz97tbgo9lkabnat2lo8z ~]# find . -atime 7 -type f -print
    [root@izwz97tbgo9lkabnat2lo8z ~]# find . -type f -size +2k
    [root@izwz97tbgo9lkabnat2lo8z ~]# find . -type f -name "*.swp" -delete
    [root@iZwz97tbgo9lkabnat2lo8Z ~]# grep "<script>" sohu.html -n
    20:<script>
    [root@iZwz97tbgo9lkabnat2lo8Z ~]# grep -E \<\/?script.*\> sohu.html -n
    20:<script>
    22:</script>
    24:<script src="//statics.itc.cn/web/v3/static/js/es5-shim-08e41cfc3e.min.js"></script>
    25:<script src="//statics.itc.cn/web/v3/static/js/es5-sham-1d5fa1124b.min.js"></script>
    26:<script src="//statics.itc.cn/web/v3/static/js/html5shiv-21fc8c2ba6.js"></script>
    29:<script type="text/javascript">
    52:</script>
    ...

    说明:grep在搜索字符串时可以使用正则表达式,如果需要使用正则表达式可以用grep -E或者直接使用egrep

  9. 创建链接和查看链接 - ln / readlink

    1
    2
    3
    4
    5
    6
    7
    8
    9
    10
    11
    12
    13
    14
    15
    [root@iZwz97tbgo9lkabnat2lo8Z ~]# ls -l sohu.html
    -rw-r--r-- 1 root root 212131 Jun 20 19:15 sohu.html
    [root@iZwz97tbgo9lkabnat2lo8Z ~]# ln /root/sohu.html /root/backup/sohu_backup
    [root@iZwz97tbgo9lkabnat2lo8Z ~]# ls -l sohu.html
    -rw-r--r-- 2 root root 212131 Jun 20 19:15 sohu.html
    [root@iZwz97tbgo9lkabnat2lo8Z ~]# ln /root/sohu.html /root/backup/sohu_backup2
    [root@iZwz97tbgo9lkabnat2lo8Z ~]# ls -l sohu.html
    -rw-r--r-- 3 root root 212131 Jun 20 19:15 sohu.html
    [root@iZwz97tbgo9lkabnat2lo8Z ~]# ln -s /etc/centos-release sysinfo
    [root@iZwz97tbgo9lkabnat2lo8Z ~]# ls -l sysinfo
    lrwxrwxrwx 1 root root 19 Jun 20 19:21 sysinfo -> /etc/centos-release
    [root@iZwz97tbgo9lkabnat2lo8Z ~]# cat sysinfo
    CentOS Linux release 7.4.1708 (Core)
    [root@iZwz97tbgo9lkabnat2lo8Z ~]# cat /etc/centos-release
    CentOS Linux release 7.4.1708 (Core)

    说明:链接可以分为硬链接和软链接(符号链接)。硬链接可以认为是一个指向文件数据的指针,就像Python中对象的引用计数,每添加一个硬链接,文件的对应链接数就增加1,只有当文件的链接数为0时,文件所对应的存储空间才有可能被其他文件覆盖。我们平常删除文件时其实并没有删除硬盘上的数据,我们删除的只是一个指针,或者说是数据的一条使用记录,所以类似于“文件粉碎机”之类的软件在“粉碎”文件时除了删除文件指针,还会在文件对应的存储区域填入数据来保证文件无法再恢复。软链接类似于Windows系统下的快捷方式,当软链接链接的文件被删除时,软链接也就失效了。

  10. 压缩/解压缩和归档/解归档 - gzip / gunzip / xz

    1
    2
    3
    4
    5
    6
    7
    8
    9
    10
    11
    12
    13
    14
    [root@iZwz97tbgo9lkabnat2lo8Z ~]# wget http://download.redis.io/releases/redis-4.0.10.tar.gz
    --2018-06-20 19:29:59-- http://download.redis.io/releases/redis-4.0.10.tar.gz
    Resolving download.redis.io (download.redis.io)... 109.74.203.151
    Connecting to download.redis.io (download.redis.io)|109.74.203.151|:80... connected.
    HTTP request sent, awaiting response... 200 OK
    Length: 1738465 (1.7M) [application/x-gzip]
    Saving to: ‘redis-4.0.10.tar.gz’
    100%[==================================================>] 1,738,465 70.1KB/s in 74s
    2018-06-20 19:31:14 (22.9 KB/s) - ‘redis-4.0.10.tar.gz’ saved [1738465/1738465]
    [root@iZwz97tbgo9lkabnat2lo8Z ~]# ls redis*
    redis-4.0.10.tar.gz
    [root@iZwz97tbgo9lkabnat2lo8Z ~]# gunzip redis-4.0.10.tar.gz
    [root@iZwz97tbgo9lkabnat2lo8Z ~]# ls redis*
    redis-4.0.10.tar
  11. 归档和解归档 - tar

    1
    2
    3
    4
    5
    6
    7
    8
    9
    10
    11
    12
    13
    14
    15
    [root@iZwz97tbgo9lkabnat2lo8Z ~]# tar -xvf redis-4.0.10.tar
    redis-4.0.10/
    redis-4.0.10/.gitignore
    redis-4.0.10/00-RELEASENOTES
    redis-4.0.10/BUGS
    redis-4.0.10/CONTRIBUTING
    redis-4.0.10/COPYING
    redis-4.0.10/INSTALL
    redis-4.0.10/MANIFESTO
    redis-4.0.10/Makefile
    redis-4.0.10/README.md
    redis-4.0.10/deps/
    redis-4.0.10/deps/Makefile
    redis-4.0.10/deps/README.md
    ...

    说明:归档(也称为创建归档)和解归档都使用tar命令,通常创建归档需要-cvf三个参数,其中c表示创建(create),v表示显示创建归档详情(verbose),f表示指定归档的文件(file);解归档需要加上-xvf参数,其中x表示抽取(extract),其他两个参数跟创建归档相同。

  12. 将标准输入转成命令行参数 - xargs

    下面的命令会将查找当前路径下的html文件,然后通过xargs将这些文件作为参数传给rm命令,实现查找并删除文件的操作。

    1
    [root@iZwz97tbgo9lkabnat2lo8Z ~]# find . -type f -name "*.html" | xargs rm -f

    下面的命令将a.txt文件中的多行内容变成一行输出到b.txt文件中,其中<表示从a.txt中读取输入,>表示将命令的执行结果输出到b.txt中。

    1
    [root@iZwz97tbgo9lkabnat2lo8Z ~]# xargs < a.txt > b.txt

    说明:这个命令就像上面演示的那样常在管道(实现进程间通信的一种方式)和重定向(重新指定输入输出的位置)操作中用到,后面的内容中会讲到管道操作和输入输出重定向操作。

  13. 显示文件或目录 - basename / dirname

  14. 其他相关工具。

    • sort - 对内容排序
    • uniq - 去掉相邻重复内容
    • tr - 替换指定内容为新内容
    • cut / paste - 剪切/黏贴内容
    • split - 拆分文件
    • file - 判断文件类型
    • wc - 统计文件行数、单词数、字节数
    • iconv - 编码转换
    1
    2
    3
    4
    5
    6
    7
    8
    9
    10
    11
    12
    13
    14
    15
    16
    17
    18
    19
    20
    21
    22
    23
    24
    25
    26
    27
    28
    29
    30
    31
    32
    33
    34
    35
    [root ~]# cat foo.txt
    grape
    apple
    pitaya
    [root ~]# cat bar.txt
    100
    200
    300
    400
    [root ~]# paste foo.txt bar.txt
    grape 100
    apple 200
    pitaya 300
    400
    [root ~]# paste foo.txt bar.txt > hello.txt
    [root ~]# cut -b 4-8 hello.txt
    pe 10
    le 20
    aya 3
    0
    [root ~]# cat hello.txt | tr '\t' ','
    grape,100
    apple,200
    pitaya,300
    ,400
    [root ~]# split -l 100 sohu.html hello
    [root ~]# wget https://www.baidu.com/img/bd_logo1.png
    [root ~]# file bd_logo1.png
    bd_logo1.png: PNG image data, 540 x 258, 8-bit colormap, non-interlaced
    [root ~]# wc sohu.html
    2979 6355 212527 sohu.html
    [root ~]# wc -l sohu.html
    2979 sohu.html
    [root ~]# wget http://www.qq.com -O qq.html
    [root ~]# iconv -f gb2312 -t utf-8 qq.html

管道和重定向

  1. 管道的使用 - |

    例子:查找当前目录下文件个数。

    1
    2
    [root ~]# find ./ | wc -l
    6152

    例子:列出当前路径下的文件和文件夹,给每一项加一个编号。

    1
    2
    3
    4
    5
    6
    [root ~]# ls | cat -n
    1 dump.rdb
    2 mongodb-3.6.5
    3 Python-3.6.5
    4 redis-3.2.11
    5 redis.conf

    例子:查找record.log中包含AAA,但不包含BBB的记录的总数

    1
    [root ~]# cat record.log | grep AAA | grep -v BBB | wc -l
  2. 输出重定向和错误重定向 - > / >> / 2>

    1
    2
    3
    4
    5
    6
    7
    8
    9
    10
    11
    12
    13
    14
    15
    16
    17
    [root ~]# cat readme.txt
    banana
    apple
    grape
    apple
    grape
    watermelon
    pear
    pitaya
    [root ~]# cat readme.txt | sort | uniq > result.txt
    [root ~]# cat result.txt
    apple
    banana
    grape
    pear
    pitaya
    watermelon
  3. 输入重定向 - <

    1
    2
    3
    4
    5
    6
    7
    8
    9
    10
    11
    [root ~]# echo 'hello, world!' > hello.txt
    [root ~]# wall < hello.txt
    [root ~]#
    Broadcast message from root (Wed Jun 20 19:43:05 2018):
    hello, world!
    [root ~]# echo 'I will show you some code.' >> hello.txt
    [root ~]# wall < hello.txt
    [root ~]#
    Broadcast message from root (Wed Jun 20 19:43:55 2018):
    hello, world!
    I will show you some code.
  4. 多重定向 - tee

    下面的命令除了在终端显示命令ls的结果之外,还会追加输出到ls.txt文件中。

    1
    [root ~]# ls | tee -a ls.txt

别名

  1. alias

    1
    2
    3
    4
    5
    6
    7
    [root ~]# alias ll='ls -l'
    [root ~]# alias frm='rm -rf'
    [root ~]# ll
    ...
    drwxr-xr-x 2 root root 4096 Jun 20 12:52 abc
    ...
    [root ~]# frm abc
  2. unalias

    1
    2
    3
    [root ~]# unalias frm
    [root ~]# frm sohu.html
    -bash: frm: command not found

文本处理

  1. 字符流编辑器 - sed

    sed是操作、过滤和转换文本内容的工具。假设有一个名为fruit.txt的文件,内容如下所示。

    1
    2
    3
    4
    5
    6
    [root ~]# cat -n fruit.txt 
    1 banana
    2 grape
    3 apple
    4 watermelon
    5 orange

    接下来,我们在第2行后面添加一个pitaya。

    1
    2
    3
    4
    5
    6
    7
    [root ~]# sed '2a pitaya' fruit.txt 
    banana
    grape
    pitaya
    apple
    watermelon
    orange

    注意:刚才的命令和之前我们讲过的很多命令一样并没有改变fruit.txt文件,而是将添加了新行的内容输出到终端中,如果想保存到fruit.txt中,可以使用输出重定向操作。

    在第2行前面插入一个waxberry。

    1
    2
    3
    4
    5
    6
    7
    [root ~]# sed '2i waxberry' fruit.txt
    banana
    waxberry
    grape
    apple
    watermelon
    orange

    删除第3行。

    1
    2
    3
    4
    5
    [root ~]# sed '3d' fruit.txt
    banana
    grape
    watermelon
    orange

    删除第2行到第4行。

    1
    2
    3
    [root ~]# sed '2,4d' fruit.txt
    banana
    orange

    将文本中的字符a替换为@。

    1
    2
    3
    4
    5
    6
    [root ~]# sed 's#a#@#' fruit.txt 
    b@nana
    gr@pe
    @pple
    w@termelon
    or@nge

    将文本中的字符a替换为@,使用全局模式。

    1
    2
    3
    4
    5
    6
    [root ~]# sed 's#a#@#g' fruit.txt 
    b@n@n@
    gr@pe
    @pple
    w@termelon
    or@nge
  2. 模式匹配和处理语言 - awk

    awk是一种编程语言,也是Linux系统中处理文本最为强大的工具,它的作者之一和现在的维护者就是之前提到过的Brian Kernighan(ken和dmr最亲密的伙伴)。通过该命令可以从文本中提取出指定的列、用正则表达式从文本中取出我们想要的内容、显示指定的行以及进行统计和运算,总之它非常强大。

    假设有一个名为fruit2.txt的文件,内容如下所示。

    1
    2
    3
    4
    5
    6
    [root ~]# cat fruit2.txt 
    1 banana 120
    2 grape 500
    3 apple 1230
    4 watermelon 80
    5 orange 400

    显示文件的第3行。

    1
    2
    [root ~]# awk 'NR==3' fruit2.txt 
    3 apple 1230

    显示文件的第2列。

    1
    2
    3
    4
    5
    6
    [root ~]# awk '{print $2}' fruit2.txt 
    banana
    grape
    apple
    watermelon
    orange

    显示文件的最后一列。

    1
    2
    3
    4
    5
    6
    [root ~]# awk '{print $NF}' fruit2.txt 
    120
    500
    1230
    80
    400

    输出末尾数字大于等于300的行。

    1
    2
    3
    4
    [root ~]# awk '{if($3 >= 300) {print $0}}' fruit2.txt 
    2 grape 500
    3 apple 1230
    5 orange 400

    上面展示的只是awk命令的冰山一角,更多的内容留给读者自己在实践中去探索。

用户管理

  1. 创建和删除用户 - useradd / userdel

    1
    2
    [root home]# useradd hellokitty
    [root home]# userdel hellokitty
    • -d - 创建用户时为用户指定用户主目录
    • -g - 创建用户时指定用户所属的用户组
  2. 创建和删除用户组 - groupadd / groupdel

    说明:用户组主要是为了方便对一个组里面所有用户的管理。

  3. 修改密码 - passwd

    1
    2
    3
    4
    [root ~]# passwd hellokitty
    New password:
    Retype new password:
    passwd: all authentication tokens updated successfully.

    说明:输入密码和确认密码没有回显且必须一气呵成的输入完成(不能使用退格键),密码和确认密码需要一致。如果使用passwd命令时没有指定命令作用的对象,则表示要修改当前用户的密码。如果想批量修改用户密码,可以使用chpasswd命令。

    • -l / -u - 锁定/解锁用户。
    • -d - 清除用户密码。
    • -e - 设置密码立即过期,用户登录时会强制要求修改密码。
    • -i - 设置密码过期多少天以后禁用该用户。
  4. 查看和修改密码有效期 - chage

    设置hellokitty用户100天后必须修改密码,过期前15天通知该用户,过期后15天禁用该用户。

    1
    chage -M 100 -W 15 -I 15 hellokitty
  5. 切换用户 - su

    1
    2
    [root ~]# su hellokitty
    [hellokitty root]$
  6. 以管理员身份执行命令 - sudo

    1
    2
    3
    4
    [hellokitty ~]$ ls /root
    ls: cannot open directory /root: Permission denied
    [hellokitty ~]$ sudo ls /root
    [sudo] password for hellokitty:

    说明:如果希望用户能够以管理员身份执行命令,用户必须要出现在sudoers名单中,sudoers文件在 /etc目录下,如果希望直接编辑该文件也可以使用下面的命令。

  7. 编辑sudoers文件 - visudo

    这里使用的编辑器是vi,关于vi的知识在后面有讲解。该文件的部分内容如下所示:

    1
    2
    3
    4
    5
    6
    7
    8
    9
    10
    11
    12
    13
    14
    15
    16
    17
    18
    ## Allow root to run any commands anywhere 
    root ALL=(ALL) ALL

    ## Allows members of the 'sys' group to run networking, software,
    ## service management apps and more.
    # %sys ALL = NETWORKING, SOFTWARE, SERVICES, STORAGE, DELEGATING, PROCESSES, LOCATE, DRIVERS
    ## Allows people in group wheel to run all commands
    %wheel ALL=(ALL) ALL

    ## Same thing without a password
    # %wheel ALL=(ALL) NOPASSWD: ALL

    ## Allows members of the users group to mount and unmount the
    ## cdrom as root
    # %users ALL=/sbin/mount /mnt/cdrom, /sbin/umount /mnt/cdrom

    ## Allows members of the users group to shutdown this system
    # %users localhost=/sbin/shutdown -h now
  8. 显示用户与用户组的信息 - id

  9. 给其他用户发消息 -write / wall

    发送方:

    1
    2
    3
    [root ~]# write hellokitty
    Dinner is on me.
    Call me at 6pm.

    接收方:

    1
    2
    3
    4
    5
    [hellokitty ~]$ 
    Message from root on pts/0 at 17:41 ...
    Dinner is on me.
    Call me at 6pm.
    EOF
  10. 查看/设置是否接收其他用户发送的消息 - mesg

    1
    2
    3
    4
    5
    [hellokitty ~]$ mesg
    is y
    [hellokitty ~]$ mesg n
    [hellokitty ~]$ mesg
    is n

文件系统

文件和路径

  1. 命名规则:文件名的最大长度与文件系统类型有关,一般情况下,文件名不应该超过255个字符,虽然绝大多数的字符都可以用于文件名,但是最好使用英文大小写字母、数字、下划线、点这样的符号。文件名中虽然可以使用空格,但应该尽可能避免使用空格,否则在输入文件名时需要用将文件名放在双引号中或者通过\对空格进行转义。
  2. 扩展名:在Linux系统下文件的扩展名是可选的,但是使用扩展名有助于对文件内容的理解。有些应用程序要通过扩展名来识别文件,但是更多的应用程序并不依赖文件的扩展名,就像file命令在识别文件时并不是依据扩展名来判定文件的类型。
  3. 隐藏文件:以点开头的文件在Linux系统中是隐藏文件(不可见文件)。

目录结构

  1. /bin - 基本命令的二进制文件。
  2. /boot - 引导加载程序的静态文件。
  3. /dev - 设备文件。
  4. /etc - 配置文件。
  5. /home - 普通用户主目录的父目录。
  6. /lib - 共享库文件。
  7. /lib64 - 共享64位库文件。
  8. /lost+found - 存放未链接文件。
  9. /media - 自动识别设备的挂载目录。
  10. /mnt - 临时挂载文件系统的挂载点。
  11. /opt - 可选插件软件包安装位置。
  12. /proc - 内核和进程信息。
  13. /root - 超级管理员用户主目录。
  14. /run - 存放系统运行时需要的东西。
  15. /sbin - 超级用户的二进制文件。
  16. /sys - 设备的伪文件系统。
  17. /tmp - 临时文件夹。
  18. /usr - 用户应用目录。
  19. /var - 变量数据目录。

访问权限

  1. chmod - 改变文件模式比特。

    1
    2
    3
    4
    5
    6
    7
    8
    9
    10
    11
    12
    13
    14
    [root ~]# ls -l
    ...
    -rw-r--r-- 1 root root 211878 Jun 19 16:06 sohu.html
    ...
    [root ~]# chmod g+w,o+w sohu.html
    [root ~]# ls -l
    ...
    -rw-rw-rw- 1 root root 211878 Jun 19 16:06 sohu.html
    ...
    [root ~]# chmod 644 sohu.html
    [root ~]# ls -l
    ...
    -rw-r--r-- 1 root root 211878 Jun 19 16:06 sohu.html
    ...

    说明:通过上面的例子可以看出,用chmod改变文件模式比特有两种方式:一种是字符设定法,另一种是数字设定法。除了chmod之外,可以通过umask来设定哪些权限将在新文件的默认权限中被删除。

    长格式查看目录或文件时显示结果及其对应权限的数值如下表所示。

  2. chown - 改变文件所有者。

    1
    2
    3
    4
    5
    6
    7
    8
    9
    [root ~]# ls -l
    ...
    -rw-r--r-- 1 root root 54 Jun 20 10:06 readme.txt
    ...
    [root ~]# chown hellokitty readme.txt
    [root ~]# ls -l
    ...
    -rw-r--r-- 1 hellokitty root 54 Jun 20 10:06 readme.txt
    ...
  3. chgrp - 改变用户组。

磁盘管理

  1. 列出文件系统的磁盘使用状况 - df

    1
    2
    3
    4
    5
    6
    7
    8
    [root ~]# df -h
    Filesystem Size Used Avail Use% Mounted on
    /dev/vda1 40G 5.0G 33G 14% /
    devtmpfs 486M 0 486M 0% /dev
    tmpfs 497M 0 497M 0% /dev/shm
    tmpfs 497M 356K 496M 1% /run
    tmpfs 497M 0 497M 0% /sys/fs/cgroup
    tmpfs 100M 0 100M 0% /run/user/0
  2. 磁盘分区表操作 - fdisk

    1
    2
    3
    4
    5
    6
    7
    8
    9
    10
    11
    12
    13
    [root ~]# fdisk -l
    Disk /dev/vda: 42.9 GB, 42949672960 bytes, 83886080 sectors
    Units = sectors of 1 * 512 = 512 bytes
    Sector size (logical/physical): 512 bytes / 512 bytes
    I/O size (minimum/optimal): 512 bytes / 512 bytes
    Disk label type: dos
    Disk identifier: 0x000a42f4
    Device Boot Start End Blocks Id System
    /dev/vda1 * 2048 83884031 41940992 83 Linux
    Disk /dev/vdb: 21.5 GB, 21474836480 bytes, 41943040 sectors
    Units = sectors of 1 * 512 = 512 bytes
    Sector size (logical/physical): 512 bytes / 512 bytes
    I/O size (minimum/optimal): 512 bytes / 512 bytes
  3. 磁盘分区工具 - parted

  4. 格式化文件系统 - mkfs

    1
    [root ~]# mkfs -t ext4 -v /dev/sdb
    • -t - 指定文件系统的类型。
    • -c - 创建文件系统时检查磁盘损坏情况。
    • -v - 显示详细信息。
  5. 文件系统检查 - fsck

  6. 转换或拷贝文件 - dd

  7. 挂载/卸载 - mount / umount

  8. 创建/激活/关闭交换分区 - mkswap / swapon / swapoff

说明:执行上面这些命令会带有一定的风险,如果不清楚这些命令的用法,最好不用随意使用,在使用的过程中,最好对照参考资料进行操作,并在操作前确认是否要这么做。

编辑器 - vim

  1. 启动vim。可以通过vivim命令来启动vim,启动时可以指定文件名来打开一个文件,如果没有指定文件名,也可以在保存的时候指定文件名。

    1
    [root ~]# vim guess.py
  2. 命令模式、编辑模式和末行模式:启动vim进入的是命令模式(也称为Normal模式),在命令模式下输入英文字母i会进入编辑模式(Insert模式),屏幕下方出现-- INSERT --提示;在编辑模式下按下Esc会回到命令模式,此时如果输入英文:会进入末行模式,在末行模式下输入q!可以在不保存当前工作的情况下强行退出vim;在命令模式下输入v会进入可视模式(Visual模式),可以用光标选择一个区域再完成对应的操作。

  3. 保存和退出vim:在命令模式下输入: 进入末行模式,输入wq可以实现保存退出;如果想放弃编辑的内容输入q!强行退出,这一点刚才已经提到过了;在命令模式下也可以直接输入ZZ实现保存退出。如果只想保存文件不退出,那么可以在末行模式下输入w;可以在w后面输入空格再指定要保存的文件名。

  4. 光标操作。

    • 在命令模式下可以通过hjkl来控制光标向左、下、上、右的方向移动,可以在字母前输入数字来表示移动的距离,例如:10h表示向左移动10个字符。
    • 在命令模式下可以通过Ctrl+yCtrl+e来实现向上、向下滚动一行文本的操作,可以通过Ctrl+fCtrl+b来实现向前和向后翻页的操作。
    • 在命令模式下可以通过输入英文字母G将光标移到文件的末尾,可以通过gg将光标移到文件的开始,也可以通过在G前输入数字来将光标移动到指定的行。
  5. 文本操作。

    • 删除:在命令模式下可以用dd来删除整行;可以在dd前加数字来指定删除的行数;可以用d$来实现删除从光标处删到行尾的操作,也可以通过d0来实现从光标处删到行首的操作;如果想删除一个单词,可以使用dw;如果要删除全文,可以在输入:%d(其中:用来从命令模式进入末行模式)。
    • 复制和粘贴:在命令模式下可以用yy来复制整行;可以在yy前加数字来指定复制的行数;可以通过p将复制的内容粘贴到光标所在的地方。
    • 撤销和恢复:在命令模式下输入u可以撤销之前的操作;通过Ctrl+r可以恢复被撤销的操作。
    • 对内容进行排序:在命令模式下输入%!sort
  6. 查找和替换。

    • 查找操作需要输入/进入末行模式并提供正则表达式来匹配与之对应的内容,例如:/doc.*\.,输入n来向前搜索,也可以输入N来向后搜索。
    • 替换操作需要输入:进入末行模式并指定搜索的范围、正则表达式以及替换后的内容和匹配选项,例如::1,$s/doc.*/hello/gice,其中:
      • g - global:全局匹配。
      • i - ignore case:忽略大小写匹配。
      • c - confirm:替换时需要确认。
      • e - error:忽略错误。
  7. 参数设定:在输入:进入末行模式后可以对vim进行设定。

    • 设置Tab键的空格数:set ts=4

    • 设置显示/不显示行号:set nu / set nonu

    • 设置启用/关闭高亮语法:syntax on / syntax off

    • 设置显示标尺(光标所在的行和列): set ruler

    • 设置启用/关闭搜索结果高亮:set hls / set nohls

      说明:如果希望上面的这些设定在每次启动vim时都能自动生效,需要将这些设定写到用户主目录下的.vimrc文件中。

  8. 高级技巧

    • 比较多个文件。

      1
      [root ~]# vim -d foo.txt bar.txt

    • 打开多个文件。

      1
      [root ~]# vim foo.txt bar.txt hello.txt

      启动vim后只有一个窗口显示的是foo.txt,可以在末行模式中输入ls查看到打开的三个文件,也可以在末行模式中输入b <num>来显示另一个文件,例如可以用:b 2将bar.txt显示出来,可以用:b 3将hello.txt显示出来。

    • 拆分和切换窗口。

      可以在末行模式中输入spvs来实现对窗口的水平或垂直拆分,这样我们就可以同时打开多个编辑窗口,通过按两次Ctrl+w就可以实现编辑窗口的切换,在一个窗口中执行退出操作只会关闭对应的窗口,其他的窗口继续保留。

    • 映射快捷键:在vim下可以将一些常用操作映射为快捷键来提升工作效率。

      • 例子1:在命令模式下输入F4执行从第一行开始删除10000行代码的操作。

        :map <F4> gg10000dd

        例子2:在编辑模式下输入__main直接补全为if __name__ == '__main__':

        :inoremap __main if __name__ == '__main__':

      说明:上面例子2的inoremap中的i表示映射的键在编辑模式使用, nore表示不要递归,这一点非常重要,否则如果键对应的内容中又出现键本身,就会引发递归(相当于进入了死循环)。如果希望映射的快捷键每次启动vim时都能生效,需要将映射写到用户主目录下的.vimrc文件中。

    • 录制宏。

      • 在命令模式下输入qa开始录制宏(其中a是寄存器的名字,也可以是其他英文字母或0-9的数字)。

      • 执行你的操作(光标操作、编辑操作等),这些操作都会被录制下来。

      • 如果录制的操作已经完成了,按q结束录制。

      • 通过@aa是刚才使用的寄存器的名字)播放宏,如果要多次执行宏可以在前面加数字,例如100@a表示将宏播放100次。

      • 可以试一试下面的例子来体验录制宏的操作,该例子来源于Harttle Land网站,该网站上提供了很多关于vim的使用技巧,有兴趣的可以了解一下。

软件安装和配置

使用包管理工具

  1. yum - Yellowdog Updater Modified。
    • yum search:搜索软件包,例如yum search nginx
    • yum list installed:列出已经安装的软件包,例如yum list installed | grep zlib
    • yum install:安装软件包,例如yum install nginx
    • yum remove:删除软件包,例如yum remove nginx
    • yum update:更新软件包,例如yum update可以更新所有软件包,而yum update tar只会更新tar。
    • yum check-update:检查有哪些可以更新的软件包。
    • yum info:显示软件包的相关信息,例如yum info nginx
  2. rpm - Redhat Package Manager。
    • 安装软件包:rpm -ivh <packagename>.rpm
    • 移除软件包:rpm -e <packagename>
    • 查询软件包:rpm -qa,例如可以用rpm -qa | grep mysql来检查是否安装了MySQL相关的软件包。

下面以Nginx为例,演示如何使用yum安装软件。

1
2
3
4
5
6
7
8
9
10
11
12
13
14
15
16
17
18
19
20
21
22
23
24
25
26
27
28
29
30
31
32
33
[root ~]# yum -y install nginx
...
Installed:
nginx.x86_64 1:1.12.2-2.el7
Dependency Installed:
nginx-all-modules.noarch 1:1.12.2-2.el7
nginx-mod-http-geoip.x86_64 1:1.12.2-2.el7
nginx-mod-http-image-filter.x86_64 1:1.12.2-2.el7
nginx-mod-http-perl.x86_64 1:1.12.2-2.el7
nginx-mod-http-xslt-filter.x86_64 1:1.12.2-2.el7
nginx-mod-mail.x86_64 1:1.12.2-2.el7
nginx-mod-stream.x86_64 1:1.12.2-2.el7
Complete!
[root ~]# yum info nginx
Loaded plugins: fastestmirror
Loading mirror speeds from cached hostfile
Installed Packages
Name : nginx
Arch : x86_64
Epoch : 1
Version : 1.12.2
Release : 2.el7
Size : 1.5 M
Repo : installed
From repo : epel
Summary : A high performance web server and reverse proxy server
URL : http://nginx.org/
License : BSD
Description : Nginx is a web server and a reverse proxy server for HTTP, SMTP, POP3 and
: IMAP protocols, with a strong focus on high concurrency, performance and low
: memory usage.
[root ~]# nginx -v
nginx version: nginx/1.12.2

移除Nginx。

1
[root ~]# yum -y remove nginx

下面以MySQL为例,演示如何使用rpm安装软件。要安装MySQL需要先到MySQL官方网站下载对应的RPM文件,当然要选择和你使用的Linux系统对应的版本。MySQL现在是Oracle公司旗下的产品,在MySQL被收购后,MySQL的作者重新制作了一个MySQL的分支MariaDB,可以通过yum进行安装。

1
2
3
4
5
6
7
8
9
10
11
12
13
14
15
[root mysql]# ls
mysql-community-client-5.7.22-1.el7.x86_64.rpm
mysql-community-common-5.7.22-1.el7.x86_64.rpm
mysql-community-libs-5.7.22-1.el7.x86_64.rpm
mysql-community-server-5.7.22-1.el7.x86_64.rpm
[root mysql]# yum -y remove mariadb-libs
[root mysql]# yum -y install libaio
[root mysql]#rpm -ivh mysql-community-common-5.7.26-1.el7.x86_64.rpm
...
[root mysql]#rpm -ivh mysql-community-libs-5.7.26-1.el7.x86_64.rpm
...
[root mysql]#rpm -ivh mysql-community-client-5.7.26-1.el7.x86_64.rpm
...
[root mysql]#rpm -ivh mysql-community-server-5.7.26-1.el7.x86_64.rpm
...

说明:由于MySQL和MariaDB的底层依赖库是有冲突的,所以上面我们首先用yum移除了名为mariadb-libs的依赖库并安装了名为libaio支持异步I/O操作的依赖库。关于MySQL和MariaDB之间的关系,可以阅读维基百科上关于MariaDB的介绍。

移除安装的MySQL。

1
[root ~]# rpm -qa | grep mysql | xargs rpm -e

下载解压配置环境变量

下面以安装MongoDB为例,演示这类软件应该如何安装。

1
2
3
4
5
6
7
8
9
10
11
12
13
14
15
16
17
18
19
20
21
22
23
24
25
26
27
28
29
30
31
32
33
34
35
36
37
38
39
40
41
42
43
44
45
46
47
48
49
50
51
52
53
54
55
[root ~]# wget https://fastdl.mongodb.org/linux/mongodb-linux-x86_64-rhel70-3.6.5.tgz
--2018-06-21 18:32:53-- https://fastdl.mongodb.org/linux/mongodb-linux-x86_64-rhel70-3.6.5.tgz
Resolving fastdl.mongodb.org (fastdl.mongodb.org)... 52.85.83.16, 52.85.83.228, 52.85.83.186, ...
Connecting to fastdl.mongodb.org (fastdl.mongodb.org)|52.85.83.16|:443... connected.
HTTP request sent, awaiting response... 200 OK
Length: 100564462 (96M) [application/x-gzip]
Saving to: ‘mongodb-linux-x86_64-rhel70-3.6.5.tgz’
100%[==================================================>] 100,564,462 630KB/s in 2m 9s
2018-06-21 18:35:04 (760 KB/s) - ‘mongodb-linux-x86_64-rhel70-3.6.5.tgz’ saved [100564462/100564462]
[root ~]# gunzip mongodb-linux-x86_64-rhel70-3.6.5.tgz
[root ~]# tar -xvf mongodb-linux-x86_64-rhel70-3.6.5.tar
mongodb-linux-x86_64-rhel70-3.6.5/README
mongodb-linux-x86_64-rhel70-3.6.5/THIRD-PARTY-NOTICES
mongodb-linux-x86_64-rhel70-3.6.5/MPL-2
mongodb-linux-x86_64-rhel70-3.6.5/GNU-AGPL-3.0
mongodb-linux-x86_64-rhel70-3.6.5/bin/mongodump
mongodb-linux-x86_64-rhel70-3.6.5/bin/mongorestore
mongodb-linux-x86_64-rhel70-3.6.5/bin/mongoexport
mongodb-linux-x86_64-rhel70-3.6.5/bin/mongoimport
mongodb-linux-x86_64-rhel70-3.6.5/bin/mongostat
mongodb-linux-x86_64-rhel70-3.6.5/bin/mongotop
mongodb-linux-x86_64-rhel70-3.6.5/bin/bsondump
mongodb-linux-x86_64-rhel70-3.6.5/bin/mongofiles
mongodb-linux-x86_64-rhel70-3.6.5/bin/mongoreplay
mongodb-linux-x86_64-rhel70-3.6.5/bin/mongoperf
mongodb-linux-x86_64-rhel70-3.6.5/bin/mongod
mongodb-linux-x86_64-rhel70-3.6.5/bin/mongos
mongodb-linux-x86_64-rhel70-3.6.5/bin/mongo
mongodb-linux-x86_64-rhel70-3.6.5/bin/install_compass
[root ~]# vim .bash_profile
...
PATH=$PATH:$HOME/bin:$HOME/mongodb-linux-x86_64-rhel70-3.6.5/bin
export PATH
...
[root ~]# source .bash_profile
[root ~]# mongod --version
db version v3.6.5
git version: a20ecd3e3a174162052ff99913bc2ca9a839d618
OpenSSL version: OpenSSL 1.0.1e-fips 11 Feb 2013
allocator: tcmalloc
modules: none
build environment:
distmod: rhel70
distarch: x86_64
target_arch: x86_64
[root ~]# mongo --version
MongoDB shell version v3.6.5
git version: a20ecd3e3a174162052ff99913bc2ca9a839d618
OpenSSL version: OpenSSL 1.0.1e-fips 11 Feb 2013
allocator: tcmalloc
modules: none
build environment:
distmod: rhel70
distarch: x86_64
target_arch: x86_64

说明:当然也可以通过yum来安装MongoDB,具体可以参照官方网站上给出的说明。

源代码构建安装

  1. 安装Python 3.6。

    1
    2
    3
    4
    5
    6
    7
    8
    9
    10
    11
    12
    13
    14
    [root ~]# yum install gcc
    [root ~]# wget https://www.python.org/ftp/python/3.6.5/Python-3.6.5.tgz
    [root ~]# gunzip Python-3.6.5.tgz
    [root ~]# tar -xvf Python-3.6.5.tar
    [root ~]# cd Python-3.6.5
    [root ~]# ./configure --prefix=/usr/local/python36 --enable-optimizations
    [root ~]# yum -y install zlib-devel bzip2-devel openssl-devel ncurses-devel sqlite-devel readline-devel tk-devel gdbm-devel db4-devel libpcap-devel xz-devel
    [root ~]# make && make install
    ...
    [root ~]# ln -s /usr/local/python36/bin/python3.6 /usr/bin/python3
    [root ~]# python3 --version
    Python 3.6.5
    [root ~]# python3 -m pip install -U pip
    [root ~]# pip3 --version

    说明:上面在安装好Python之后还需要注册PATH环境变量,将Python安装路径下bin文件夹的绝对路径注册到PATH环境变量中。注册环境变量可以修改用户主目录下的.bash_profile或者/etc目录下的profile文件,二者的区别在于前者相当于是用户环境变量,而后者相当于是系统环境变量。

  2. 安装Redis-3.2.12。

    1
    2
    3
    4
    5
    6
    7
    8
    9
    [root ~]# wget http://download.redis.io/releases/redis-3.2.12.tar.gz
    [root ~]# gunzip redis-3.2.12.tar.gz
    [root ~]# tar -xvf redis-3.2.12.tar
    [root ~]# cd redis-3.2.12
    [root ~]# make && make install
    [root ~]# redis-server --version
    Redis server v=3.2.12 sha=00000000:0 malloc=jemalloc-4.0.3 bits=64 build=5bc5cd3c03d6ceb6
    [root ~]# redis-cli --version
    redis-cli 3.2.12

配置服务

我们可以Linux系统下安装和配置各种服务,也就是说我们可以把Linux系统打造成数据库服务器、Web服务器、缓存服务器、文件服务器、消息队列服务器等等。Linux下的大多数服务都被设置为守护进程(驻留在系统后台运行,但不会因为服务还在运行而导致Linux无法停止运行),所以我们安装的服务通常名字后面都有一个字母d,它是英文单词daemon的缩写,例如:防火墙服务叫firewalld,我们之前安装的MySQL服务叫mysqld,Apache服务器叫httpd等。在安装好服务之后,可以使用systemctl命令或service命令来完成对服务的启动、停止等操作,具体操作如下所示。

  1. 启动防火墙服务。

    1
    [root ~]# systemctl start firewalld
  2. 终止防火墙服务。

    1
    [root ~]# systemctl stop firewalld
  3. 重启防火墙服务。

    1
    [root ~]# systemctl restart firewalld
  4. 查看防火墙服务状态。

    1
    [root ~]# systemctl status firewalld
  5. 设置/禁用防火墙服务开机自启。

    1
    2
    3
    4
    5
    6
    [root ~]# systemctl enable firewalld
    Created symlink from /etc/systemd/system/dbus-org.fedoraproject.FirewallD1.service to /usr/lib/systemd/system/firewalld.service.
    Created symlink from /etc/systemd/system/multi-user.target.wants/firewalld.service to /usr/lib/systemd/system/firewalld.service.
    [root ~]# systemctl disable firewalld
    Removed symlink /etc/systemd/system/multi-user.target.wants/firewalld.service.
    Removed symlink /etc/systemd/system/dbus-org.fedoraproject.FirewallD1.service.

计划任务

  1. 在指定的时间执行命令

    • at - 将任务排队,在指定的时间执行。
    • atq - 查看待执行的任务队列。
    • atrm - 从队列中删除待执行的任务。

    指定3天以后下午5点要执行的任务。

    1
    2
    3
    4
    [root ~]# at 5pm+3days
    at> rm -f /root/*.html
    at> <EOT>
    job 9 at Wed Jun 5 17:00:00 2019

    查看待执行的任务队列。

    1
    2
    [root ~]# atq
    9 Wed Jun 5 17:00:00 2019 a root

    从队列中删除指定的任务。

    1
    [root ~]$ atrm 9
  2. 计划任务表 - crontab

    1
    2
    3
    [root ~]# crontab -e
    * * * * * echo "hello, world!" >> /root/hello.txt
    59 23 * * * rm -f /root/*.log

    说明:输入crontab -e命令会打开vim来编辑Cron表达式并指定触发的任务,上面我们定制了两个计划任务,一个是每分钟向/root目录下的hello.txt中追加输出hello, world!;另一个是每天23时59分执行删除/root目录下以log为后缀名的文件。如果不知道Cron表达式如何书写,可以参照/etc/crontab文件中的提示(下面会讲到)或者用搜索引擎找一下“Cron表达式在线生成器”来生成Cron表达式。

    和crontab相关的文件在/etc目录下,通过修改/etc目录下的crontab文件也能够定制计划任务。

    1
    2
    3
    4
    5
    6
    7
    8
    9
    10
    11
    12
    13
    14
    15
    16
    17
    18
    19
    20
    21
    22
    23
    24
    25
    [root ~]# cd /etc
    [root etc]# ls -l | grep cron
    -rw-------. 1 root root 541 Aug 3 2017 anacrontab
    drwxr-xr-x. 2 root root 4096 Mar 27 11:56 cron.d
    drwxr-xr-x. 2 root root 4096 Mar 27 11:51 cron.daily
    -rw-------. 1 root root 0 Aug 3 2017 cron.deny
    drwxr-xr-x. 2 root root 4096 Mar 27 11:50 cron.hourly
    drwxr-xr-x. 2 root root 4096 Jun 10 2014 cron.monthly
    -rw-r--r-- 1 root root 493 Jun 23 15:09 crontab
    drwxr-xr-x. 2 root root 4096 Jun 10 2014 cron.weekly
    [root etc]# vim crontab
    1 SHELL=/bin/bash
    2 PATH=/sbin:/bin:/usr/sbin:/usr/bin
    3 MAILTO=root
    4
    5 # For details see man 4 crontabs
    6
    7 # Example of job definition:
    8 # .---------------- minute (0 - 59)
    9 # | .------------- hour (0 - 23)
    10 # | | .---------- day of month (1 - 31)
    11 # | | | .------- month (1 - 12) OR jan,feb,mar,apr ...
    12 # | | | | .---- day of week (0 - 6) (Sunday=0 or 7) OR sun,mon,tue,wed,thu,fri,sat
    13 # | | | | |
    14 # * * * * * user-name command to be executed

网络访问和管理

  1. 安全远程连接 - ssh

    1
    2
    3
    4
    5
    6
    7
    [root ~]$ ssh root@120.77.222.217
    The authenticity of host '120.77.222.217 (120.77.222.217)' can't be established.
    ECDSA key fingerprint is SHA256:BhUhykv+FvnIL03I9cLRpWpaCxI91m9n7zBWrcXRa8w.
    ECDSA key fingerprint is MD5:cc:85:e9:f0:d7:07:1a:26:41:92:77:6b:7f:a0:92:65.
    Are you sure you want to continue connecting (yes/no)? yes
    Warning: Permanently added '120.77.222.217' (ECDSA) to the list of known hosts.
    root@120.77.222.217's password:
  2. 通过网络获取资源 - wget

    • -b 后台下载模式
    • -O 下载到指定的目录
    • -r 递归下载
  3. 发送和接收邮件 - mail

  4. 网络配置工具(旧) - ifconfig

    1
    2
    3
    4
    5
    6
    7
    8
    [root ~]# ifconfig eth0
    eth0: flags=4163<UP,BROADCAST,RUNNING,MULTICAST> mtu 1500
    inet 172.18.61.250 netmask 255.255.240.0 broadcast 172.18.63.255
    ether 00:16:3e:02:b6:46 txqueuelen 1000 (Ethernet)
    RX packets 1067841 bytes 1296732947 (1.2 GiB)
    RX errors 0 dropped 0 overruns 0 frame 0
    TX packets 409912 bytes 43569163 (41.5 MiB)
    TX errors 0 dropped 0 overruns 0 carrier 0 collisions
  5. 网络配置工具(新) - ip

    1
    2
    3
    4
    5
    6
    7
    8
    9
    [root ~]# ip address
    1: lo: <LOOPBACK,UP,LOWER_UP> mtu 65536 qdisc noqueue state UNKNOWN qlen 1
    link/loopback 00:00:00:00:00:00 brd 00:00:00:00:00:00
    inet 127.0.0.1/8 scope host lo
    valid_lft forever preferred_lft forever
    2: eth0: <BROADCAST,MULTICAST,UP,LOWER_UP> mtu 1500 qdisc pfifo_fast state UP qlen 1000
    link/ether 00:16:3e:02:b6:46 brd ff:ff:ff:ff:ff:ff
    inet 172.18.61.250/20 brd 172.18.63.255 scope global eth0
    valid_lft forever preferred_lft forever
  6. 网络可达性检查 - ping

    1
    2
    3
    4
    5
    6
    7
    8
    [root ~]# ping www.baidu.com -c 3
    PING www.a.shifen.com (220.181.111.188) 56(84) bytes of data.
    64 bytes from 220.181.111.188 (220.181.111.188): icmp_seq=1 ttl=51 time=36.3 ms
    64 bytes from 220.181.111.188 (220.181.111.188): icmp_seq=2 ttl=51 time=36.4 ms
    64 bytes from 220.181.111.188 (220.181.111.188): icmp_seq=3 ttl=51 time=36.4 ms
    --- www.a.shifen.com ping statistics ---
    3 packets transmitted, 3 received, 0% packet loss, time 2002ms
    rtt min/avg/max/mdev = 36.392/36.406/36.427/0.156 ms
  7. 显示或管理路由表 - route

  8. 查看网络服务和端口 - netstat / ss

    1
    [root ~]# netstat -nap | grep nginx
  9. 网络监听抓包 - tcpdump

  10. 安全文件拷贝 - scp

    1
    [root ~]# scp root@1.2.3.4:/root/guido.jpg hellokitty@4.3.2.1:/home/hellokitty/pic.jpg
  11. 文件同步工具 - rsync

    说明:使用rsync可以实现文件的自动同步,这个对于文件服务器来说相当重要。关于这个命令的用法,我们在后面讲项目部署的时候为大家详细说明。

  12. 安全文件传输 - sftp

    1
    2
    3
    4
    [root ~]# sftp root@1.2.3.4
    root@1.2.3.4's password:
    Connected to 1.2.3.4.
    sftp>
    • help:显示帮助信息。

    • ls/lls:显示远端/本地目录列表。

    • cd/lcd:切换远端/本地路径。

    • mkdir/lmkdir:创建远端/本地目录。

    • pwd/lpwd:显示远端/本地当前工作目录。

    • get:下载文件。

    • put:上传文件。

    • rm:删除远端文件。

    • bye/exit/quit:退出sftp。

进程管理

  1. 查看进程 - ps

    1
    2
    3
    4
    5
    6
    7
    8
    [root ~]# ps -ef
    UID PID PPID C STIME TTY TIME CMD
    root 1 0 0 Jun23 ? 00:00:05 /usr/lib/systemd/systemd --switched-root --system --deserialize 21
    root 2 0 0 Jun23 ? 00:00:00 [kthreadd]
    ...
    [root ~]# ps -ef | grep mysqld
    root 4943 4581 0 22:45 pts/0 00:00:00 grep --color=auto mysqld
    mysql 25257 1 0 Jun25 ? 00:00:39 /usr/sbin/mysqld --daemonize --pid-file=/var/run/mysqld/mysqld.pid
  2. 显示进程状态树 - pstree

    1
    2
    3
    4
    5
    6
    7
    8
    9
    10
    11
    12
    13
    14
    15
    16
    17
    18
    19
    20
    21
    [root ~]# pstree
    systemd─┬─AliYunDun───18*[{AliYunDun}]
    ├─AliYunDunUpdate───3*[{AliYunDunUpdate}]
    ├─2*[agetty]
    ├─aliyun-service───2*[{aliyun-service}]
    ├─atd
    ├─auditd───{auditd}
    ├─dbus-daemon
    ├─dhclient
    ├─irqbalance
    ├─lvmetad
    ├─mysqld───28*[{mysqld}]
    ├─nginx───2*[nginx]
    ├─ntpd
    ├─polkitd───6*[{polkitd}]
    ├─rsyslogd───2*[{rsyslogd}]
    ├─sshd───sshd───bash───pstree
    ├─systemd-journal
    ├─systemd-logind
    ├─systemd-udevd
    └─tuned───4*[{tuned}]
  3. 查找与指定条件匹配的进程 - pgrep

    1
    2
    [root ~]$ pgrep mysqld
    3584
  4. 通过进程号终止进程 - kill

    1
    2
    3
    4
    5
    6
    7
    8
    9
    10
    11
    12
    13
    14
    15
    16
    [root ~]$ kill -l
    1) SIGHUP 2) SIGINT 3) SIGQUIT 4) SIGILL 5) SIGTRAP
    6) SIGABRT 7) SIGBUS 8) SIGFPE 9) SIGKILL 10) SIGUSR1
    11) SIGSEGV 12) SIGUSR2 13) SIGPIPE 14) SIGALRM 15) SIGTERM
    16) SIGSTKFLT 17) SIGCHLD 18) SIGCONT 19) SIGSTOP 20) SIGTSTP
    21) SIGTTIN 22) SIGTTOU 23) SIGURG 24) SIGXCPU 25) SIGXFSZ
    26) SIGVTALRM 27) SIGPROF 28) SIGWINCH 29) SIGIO 30) SIGPWR
    31) SIGSYS 34) SIGRTMIN 35) SIGRTMIN+1 36) SIGRTMIN+2 37) SIGRTMIN+3
    38) SIGRTMIN+4 39) SIGRTMIN+5 40) SIGRTMIN+6 41) SIGRTMIN+7 42) SIGRTMIN+8
    43) SIGRTMIN+9 44) SIGRTMIN+10 45) SIGRTMIN+11 46) SIGRTMIN+12 47) SIGRTMIN+13
    48) SIGRTMIN+14 49) SIGRTMIN+15 50) SIGRTMAX-14 51) SIGRTMAX-13 52) SIGRTMAX-12
    53) SIGRTMAX-11 54) SIGRTMAX-10 55) SIGRTMAX-9 56) SIGRTMAX-8 57) SIGRTMAX-7
    58) SIGRTMAX-6 59) SIGRTMAX-5 60) SIGRTMAX-4 61) SIGRTMAX-3 62) SIGRTMAX-2
    63) SIGRTMAX-1 64) SIGRTMAX
    [root ~]# kill 1234
    [root ~]# kill -9 1234

    例子:用一条命令强制终止正在运行的Redis进程。

    1
    ps -ef | grep redis | grep -v grep | awk '{print $2}' | xargs kill
  5. 通过进程名终止进程 - killall / pkill

    结束名为mysqld的进程。

    1
    [root ~]# pkill mysqld

    结束hellokitty用户的所有进程。

    1
    [root ~]# pkill -u hellokitty

    说明:这样的操作会让hellokitty用户和服务器断开连接。

  6. 将进程置于后台运行。

    • Ctrl+Z - 快捷键,用于停止进程并置于后台。
    • & - 将进程置于后台运行。
    1
    2
    3
    4
    5
    [root ~]# mongod &
    [root ~]# redis-server
    ...
    ^Z
    [4]+ Stopped redis-server
  7. 查询后台进程 - jobs

    1
    2
    3
    4
    [root ~]# jobs
    [2] Running mongod &
    [3]- Stopped cat
    [4]+ Stopped redis-server
  8. 让进程在后台继续运行 - bg

    1
    2
    3
    4
    5
    6
    [root ~]# bg %4
    [4]+ redis-server &
    [root ~]# jobs
    [2] Running mongod &
    [3]+ Stopped cat
    [4]- Running redis-server &
  9. 将后台进程置于前台 - fg

    1
    2
    [root ~]# fg %4
    redis-server

    说明:置于前台的进程可以使用Ctrl+C来终止它。

  10. 调整程序/进程运行时优先级 - nice / renice

  11. 用户登出后进程继续工作 - nohup

    1
    [root ~]# nohup ping www.baidu.com > result.txt &
  12. 跟踪进程系统调用情况 - strace

    1
    2
    3
    4
    5
    6
    7
    8
    9
    10
    11
    12
    13
    14
    [root ~]# pgrep mysqld
    8803
    [root ~]# strace -c -p 8803
    strace: Process 8803 attached
    ^Cstrace: Process 8803 detached
    % time seconds usecs/call calls errors syscall
    ------ ----------- ----------- --------- --------- ----------------
    99.18 0.005719 5719 1 restart_syscall
    0.49 0.000028 28 1 mprotect
    0.24 0.000014 14 1 clone
    0.05 0.000003 3 1 mmap
    0.03 0.000002 2 1 accept
    ------ ----------- ----------- --------- --------- ----------------
    100.00 0.005766 5 total

    说明:这个命令的用法和参数都比较复杂,建议大家在真正用到这个命令的时候再根据实际需要进行了解。

  13. 查看当前运行级别 - runlevel

    1
    2
    [root ~]# runlevel
    N 3
  14. 实时监控进程占用资源状况 - top

    1
    2
    3
    4
    5
    6
    7
    [root ~]# top
    top - 23:04:23 up 3 days, 14:10, 1 user, load average: 0.00, 0.01, 0.05
    Tasks: 65 total, 1 running, 64 sleeping, 0 stopped, 0 zombie
    %Cpu(s): 0.3 us, 0.3 sy, 0.0 ni, 99.3 id, 0.0 wa, 0.0 hi, 0.0 si, 0.0 st
    KiB Mem : 1016168 total, 191060 free, 324700 used, 500408 buff/cache
    KiB Swap: 0 total, 0 free, 0 used. 530944 avail Mem
    ...
    • -c - 显示进程的整个路径。
    • -d - 指定两次刷屏之间的间隔时间(秒为单位)。
    • -i - 不显示闲置进程或僵尸进程。
    • -p - 显示指定进程的信息。

系统诊断

  1. 系统启动异常诊断 - dmesg

  2. 查看系统活动信息 - sar

    1
    2
    3
    4
    5
    6
    7
    8
    [root ~]# sar -u -r 5 10
    Linux 3.10.0-957.10.1.el7.x86_64 (izwz97tbgo9lkabnat2lo8z) 06/02/2019 _x86_64_ (2 CPU)

    06:48:30 PM CPU %user %nice %system %iowait %steal %idle
    06:48:35 PM all 0.10 0.00 0.10 0.00 0.00 99.80

    06:48:30 PM kbmemfree kbmemused %memused kbbuffers kbcached kbcommit %commit kbactive kbinact kbdirty
    06:48:35 PM 1772012 2108392 54.33 102816 1634528 784940 20.23 793328 1164704 0
    • -A - 显示所有设备(CPU、内存、磁盘)的运行状况。
    • -u - 显示所有CPU的负载情况。
    • -d - 显示所有磁盘的使用情况。
    • -r - 显示内存的使用情况。
    • -n - 显示网络运行状态。
  3. 查看内存使用情况 - free

    1
    2
    3
    4
    [root ~]# free
    total used free shared buff/cache available
    Mem: 1016168 323924 190452 356 501792 531800
    Swap: 0 0 0
  4. 虚拟内存统计 - vmstat

    1
    2
    3
    4
    [root ~]# vmstat
    procs -----------memory---------- ---swap-- -----io---- -system-- ------cpu-----
    r b swpd free buff cache si so bi bo in cs us sy id wa st
    2 0 0 204020 79036 667532 0 0 5 18 101 58 1 0 99 0 0
  5. CPU信息统计 - mpstat

    1
    2
    3
    4
    5
    [root ~]# mpstat
    Linux 3.10.0-957.5.1.el7.x86_64 (iZ8vba0s66jjlfmo601w4xZ) 05/30/2019 _x86_64_ (1 CPU)

    01:51:54 AM CPU %usr %nice %sys %iowait %irq %soft %steal %guest %gnice %idle
    01:51:54 AM all 0.71 0.00 0.17 0.04 0.00 0.00 0.00 0.00 0.00 99.07
  6. 查看进程使用内存状况 - pmap

    1
    2
    3
    4
    5
    6
    7
    8
    9
    10
    11
    12
    13
    14
    [root ~]# ps
    PID TTY TIME CMD
    4581 pts/0 00:00:00 bash
    5664 pts/0 00:00:00 ps
    [root ~]# pmap 4581
    4581: -bash
    0000000000400000 884K r-x-- bash
    00000000006dc000 4K r---- bash
    00000000006dd000 36K rw--- bash
    00000000006e6000 24K rw--- [ anon ]
    0000000001de0000 400K rw--- [ anon ]
    00007f82fe805000 48K r-x-- libnss_files-2.17.so
    00007f82fe811000 2044K ----- libnss_files-2.17.so
    ...
  7. 报告设备CPU和I/O统计信息 - iostat

    1
    2
    3
    4
    5
    6
    7
    [root ~]# iostat
    Linux 3.10.0-693.11.1.el7.x86_64 (iZwz97tbgo9lkabnat2lo8Z) 06/26/2018 _x86_64_ (1 CPU)
    avg-cpu: %user %nice %system %iowait %steal %idle
    0.79 0.00 0.20 0.04 0.00 98.97
    Device: tps kB_read/s kB_wrtn/s kB_read kB_wrtn
    vda 0.85 6.78 21.32 2106565 6623024
    vdb 0.00 0.01 0.00 2088 0
  8. 显示所有PCI设备 - lspci

    1
    2
    3
    4
    5
    6
    7
    8
    9
    10
    11
    12
    [root ~]# lspci
    00:00.0 Host bridge: Intel Corporation 440FX - 82441FX PMC [Natoma] (rev 02)
    00:01.0 ISA bridge: Intel Corporation 82371SB PIIX3 ISA [Natoma/Triton II]
    00:01.1 IDE interface: Intel Corporation 82371SB PIIX3 IDE [Natoma/Triton II]
    00:01.2 USB controller: Intel Corporation 82371SB PIIX3 USB [Natoma/Triton II] (rev 01)
    00:01.3 Bridge: Intel Corporation 82371AB/EB/MB PIIX4 ACPI (rev 03)
    00:02.0 VGA compatible controller: Cirrus Logic GD 5446
    00:03.0 Ethernet controller: Red Hat, Inc. Virtio network device
    00:04.0 Communication controller: Red Hat, Inc. Virtio console
    00:05.0 SCSI storage controller: Red Hat, Inc. Virtio block device
    00:06.0 SCSI storage controller: Red Hat, Inc. Virtio block device
    00:07.0 Unclassified device [00ff]: Red Hat, Inc. Virtio memory balloon
  9. 显示进程间通信设施的状态 - ipcs

    1
    2
    3
    4
    5
    6
    7
    8
    9
    10
    [root ~]# ipcs

    ------ Message Queues --------
    key msqid owner perms used-bytes messages

    ------ Shared Memory Segments --------
    key shmid owner perms bytes nattch status

    ------ Semaphore Arrays --------
    key semid owner perms nsems

Shell编程

之前我们提到过,Shell是一个连接用户和操作系统的应用程序,它提供了人机交互的界面(接口),用户通过这个界面访问操作系统内核的服务。Shell脚本是一种为Shell编写的脚本程序,我们可以通过Shell脚本来进行系统管理,同时也可以通过它进行文件操作。总之,编写Shell脚本对于使用Linux系统的人来说,应该是一项标配技能。

互联网上有大量关于Shell脚本的相关知识,我不打算再此对Shell脚本做一个全面系统的讲解,我们通过下面的代码来感性的认识下Shell脚本就行了。

例子1:输入两个整数m和n,计算从m到n的整数求和的结果。

1
2
3
4
5
6
7
8
9
10
11
12
13
#!/usr/bin/bash
printf 'm = '
read m
printf 'n = '
read n
a=$m
sum=0
while [ $a -le $n ]
do
sum=$[ sum + a ]
a=$[ a + 1 ]
done
echo '结果: '$sum

例子2:自动创建文件夹和指定数量的文件。

1
2
3
4
5
6
7
8
9
10
11
12
13
14
15
16
17
18
19
20
21
22
23
24
25
26
27
28
29
30
31
32
33
34
35
#!/usr/bin/bash
printf '输入文件名: '
read file
printf '输入文件数量(<1000): '
read num
if [ $num -ge 1000 ]
then
echo '文件数量不能超过1000'
else
if [ -e $dir -a -d $dir ]
then
rm -rf $dir
else
if [ -e $dir -a -f $dir ]
then
rm -f $dir
fi
fi
mkdir -p $dir
index=1
while [ $index -le $num ]
do
if [ $index -lt 10 ]
then
pre='00'
elif [ $index -lt 100 ]
then
pre='0'
else
pre=''
fi
touch $dir'/'$file'_'$pre$index
index=$[ index + 1 ]
done
fi

例子3:自动安装指定版本的Redis。

1
2
3
4
5
6
7
8
9
10
11
12
13
14
15
16
17
18
#!/usr/bin/bash
install_redis() {
if ! which redis-server > /dev/null
then
cd /root
wget $1$2'.tar.gz' >> install.log
gunzip /root/$2'.tar.gz'
tar -xf /root/$2'.tar'
cd /root/$2
make >> install.log
make install >> install.log
echo '安装完成'
else
echo '已经安装过Redis'
fi
}

install_redis 'http://download.redis.io/releases/' $1

相关资源

  1. Linux命令行常用快捷键

    快捷键 功能说明
    tab 自动补全命令或路径
    Ctrl+a 将光标移动到命令行行首
    Ctrl+e 将光标移动到命令行行尾
    Ctrl+f 将光标向右移动一个字符
    Ctrl+b 将光标向左移动一个字符
    Ctrl+k 剪切从光标到行尾的字符
    Ctrl+u 剪切从光标到行首的字符
    Ctrl+w 剪切光标前面的一个单词
    Ctrl+y 复制剪切命名剪切的内容
    Ctrl+c 中断正在执行的任务
    Ctrl+h 删除光标前面的一个字符
    Ctrl+d 退出当前命令行
    Ctrl+r 搜索历史命令
    Ctrl+g 退出历史命令搜索
    Ctrl+l 清除屏幕上所有内容在屏幕的最上方开启一个新行
    Ctrl+s 锁定终端使之暂时无法输入内容
    Ctrl+q 退出终端锁定
    Ctrl+z 将正在终端执行的任务停下来放到后台
    !! 执行上一条命令
    !数字 执行数字对应的历史命令
    !字母 执行最近的以字母打头的命令
    !$ / Esc+. 获得上一条命令最后一个参数
    Esc+b 移动到当前单词的开头
    Esc+f 移动到当前单词的结尾
  2. man查阅命令手册的内容说明

    手册中的标题 功能说明
    NAME 命令的说明和介绍
    SYNOPSIS 使用该命令的基本语法
    DESCRIPTION 使用该命令的详细描述,各个参数的作用,有时候这些信息会出现在OPTIONS中
    OPTIONS 命令相关参数选项的说明
    EXAMPLES 使用该命令的参考例子
    EXIT STATUS 命令结束的退出状态码,通常0表示成功执行
    SEE ALSO 和命令相关的其他命令或信息
    BUGS 和命令相关的缺陷的描述
    AUTHOR 该命令的作者介绍

Web前端概述

说明:本文使用的部分插图来自Jon Duckett*先生的HTML and CSS: Design and Build Websites*一书,这是一本非常棒的前端入门书,有兴趣的读者可以在亚马逊或者其他网站上找到该书的购买链接。

HTML简史

  1. 1991年10月:一个非正式CERN(欧洲核子研究中心)文件首次公开18个HTML标签,这个文件的作者是物理学家蒂姆·伯纳斯-李,因此他是万维网的发明者,也是万维网联盟的主席。
  2. 1995年11月:HTML 2.0标准发布(RFC 1866)。
  3. 1997年1月:HTML 3.2作为W3C推荐标准发布。
  4. 1997年12月:HTML 4.0作为W3C推荐标准发布。
  5. 1999年12月:HTML4.01作为W3C推荐标准发布。
  6. 2008年1月:HTML5由W3C作为工作草案发布。
  7. 2011年5月:W3C将HTML5推进至“最终征求”(Last Call)阶段。
  8. 2012年12月:W3C指定HTML5作为“候选推荐”阶段。
  9. 2014年10月:HTML5作为稳定W3C推荐标准发布,这意味着HTML5的标准化已经完成。

HTML5新特性

  1. 引入原生多媒体支持(audio和video标签)
  2. 引入可编程内容(canvas标签)
  3. 引入语义Web(article、aside、details、figure、footer、header、nav、section、summary等标签)
  4. 引入新的表单控件(日历、邮箱、搜索、滑条等)
  5. 引入对离线存储更好的支持(localStorage和sessionStorage)
  6. 引入对定位、拖放、WebSocket、后台任务等的支持

使用标签承载内容

结构

  • html
    • head
      • title
      • meta
    • body

文本

  • 标题(heading)和段落(paragraph)
    • h1 ~ h6
    • p
  • 上标(superscript)和下标(subscript)
    • sup
    • sub
  • 空白(白色空间折叠)
  • 折行(break)和水平标尺(horizontal ruler)
    • br
    • hr
  • 语义化标签
    • 加粗和强调 - strong
    • 引用 - blockquote
    • 缩写词和首字母缩写词 - abbr / acronym
    • 引文 - cite
    • 所有者联系信息 - address
    • 内容的修改 - ins / del

列表(list)

  • 有序列表(ordered list)- ol / li
  • 无序列表(unordered list)- ul / li
  • 定义列表(definition list)- dl / dt / dd

链接(anchor)

  • 页面链接
  • 锚链接
  • 功能链接

图像(image)

  • 图像存储位置

  • 图像及其宽高

  • 选择正确的图像格式

    • JPEG
    • GIF
    • PNG
  • 矢量图

  • 语义化标签 - figure / figcaption

表格(table)

  • 基本的表格结构 - table / tr / td / th
  • 表格的标题 - caption
  • 跨行和跨列 - rowspan属性 / colspan属性
  • 长表格 - thead / tbody / tfoot

表单(form)

  • 重要属性 - action / method / enctype
  • 表单控件(input)- type属性
    • 文本框 - text / 密码框 - password / 数字框 - number
    • 邮箱 - email / 电话 - tel / 日期 - date / 滑条 - range / URL - url / 搜索 - search
    • 单选按钮 - radio / 复选按钮 - checkbox
    • 文件上传 - file / 隐藏域 - hidden
    • 提交按钮 - submit / 图像按钮 - image / 重置按钮 - reset
  • 下拉列表 - select / option
  • 文本域(多行文本)- textarea
  • 组合表单元素 - fieldset / legend

音视频(audio / video)

  • 视频格式和播放器
  • 视频托管服务
  • 添加视频的准备工作
  • video标签和属性 - autoplay / controls / loop / muted / preload / src
  • audio标签和属性 - autoplay / controls / loop / muted / preload / src / width / height / poster

窗口(frame)

  • 框架集(过时,不建议使用) - frameset / frame

  • 内嵌窗口 - iframe

其他

  • 文档类型

    1
    <!doctype html>
    1
    <!DOCTYPE HTML PUBLIC "-//W3C//DTD HTML 4.01//EN" "http://www.w3.org/TR/html4/strict.dtd">
    1
    <!DOCTYPE HTML PUBLIC "-//W3C//DTD HTML 4.01 Transitional//EN" "http://www.w3.org/TR/html4/loose.dtd">
  • 注释

    1
    <!-- 这是一段注释,注释不能够嵌套 -->
  • 属性

    • id:唯一标识
    • class:元素所属的类,用于区分不同的元素
    • title:元素的额外信息(鼠标悬浮时会显示工具提示文本)
    • tabindex:Tab键切换顺序
    • contenteditable:元素是否可编辑
    • draggable:元素是否可拖拽
  • 块级元素 / 行级元素

  • 字符实体(实体替换符)

使用CSS渲染页面

简介

  • CSS的作用

  • CSS的工作原理

  • 规则、属性和值

  • 常用选择器

颜色(color)

  • 如何指定颜色
  • 颜色术语和颜色对比
  • 背景色

文本(text / font)

  • 文本的大小和字型(font-size / font-family)

  • 粗细、样式、拉伸和装饰(font-weight / font-style / font-stretch / text-decoration)

  • 行间距(line-height)、字母间距(letter-spacing)和单词间距(word-spacing)

  • 对齐(text-align)方式和缩进(text-ident)

  • 链接样式(:link / :visited / :active / :hover)

  • CSS3新属性

    • 阴影效果 - text-shadow
    • 首字母和首行文本(:first-letter / :first-line)
    • 响应用户

盒子(box model)

  • 盒子大小的控制(width / height)

  • 盒子的边框、外边距和内边距(border / margin / padding)

  • 盒子的显示和隐藏(display / visibility)

  • CSS3新属性

    • 边框图像(border-image)
    • 投影(border-shadow)
    • 圆角(border-radius)

列表、表格和表单

  • 列表的项目符号(list-style)
  • 表格的边框和背景(border-collapse)
  • 表单控件的外观
  • 表单控件的对齐
  • 浏览器的开发者工具

图像

  • 控制图像的大小(display: inline-block)
  • 对齐图像
  • 背景图像(background / background-image / background-repeat / background-position)

布局

  • 控制元素的位置(position / z-index)

    • 普通流
    • 相对定位
    • 绝对定位
    • 固定定位
    • 浮动元素(float / clear)
  • 网站布局

    • HTML5布局

  • 适配屏幕尺寸

    • 固定宽度布局
    • 流体布局
    • 布局网格

使用JavaScript控制行为

JavaScript基本语法

  • 语句和注释
  • 变量和数据类型
    • 声明和赋值
    • 简单数据类型和复杂数据类型
    • 变量的命名规则
  • 表达式和运算符
    • 赋值运算符
    • 算术运算符
    • 比较运算符
    • 逻辑运算符
  • 分支结构
    • if...else...
    • switch...cas...default...
  • 循环结构
    • for循环
    • while循环
    • do...while循环
  • 数组
    • 创建数组
    • 操作数组中的元素
  • 函数
    • 声明函数
    • 调用函数
    • 参数和返回值
    • 匿名函数
    • 立即调用函数

面向对象

  • 对象的概念
  • 创建对象的字面量语法
  • 访问成员运算符
  • 创建对象的构造函数语法
    • this关键字
  • 添加和删除属性
    • delete关键字
  • 标准对象
    • Number / String / Boolean / Symbol / Array / Function
    • Date / Error / Math / RegEx / Object / Map / Set
    • JSON / Promise / Generator / Reflect / Proxy

BOM

  • window对象的属性和方法
  • history对象
    • forward() / back() / go()
  • location对象
  • navigator对象
  • screen对象

DOM

  • DOM树
  • 访问元素
    • getElementById() / querySelector()
    • getElementsByClassName() / getElementsByTagName() / querySelectorAll()
    • parentNode / previousSibling / nextSibling / children / firstChild / lastChild
      • 操作元素
      • nodeValue
      • innerHTML / textContent / createElement() / createTextNode() / appendChild() / insertBefore() / removeChild()
      • className / id / hasAttribute() / getAttribute() / setAttribute() / removeAttribute()
      • 事件处理
      • 事件类型
    • UI事件:load / unload / error / resize / scroll
    • 键盘事件:keydown / keyup / keypress
    • 鼠标事件:click / dbclick / mousedown / mouseup / mousemove / mouseover / mouseout
    • 焦点事件:focus / blur
    • 表单事件:input / change / submit / reset / cut / copy / paste / select
      • 事件绑定
    • HTML事件处理程序(不推荐使用,因为要做到标签与代码分离)
    • 传统的DOM事件处理程序(只能附加一个回调函数)
    • 事件监听器(旧的浏览器中不被支持)
      • 事件流:事件捕获 / 事件冒泡
      • 事件对象(低版本IE中的window.event)
    • target(有些浏览器使用srcElement)
    • type
    • cancelable
    • preventDefault()
    • stopPropagation()(低版本IE中的cancelBubble)
      • 鼠标事件 - 事件发生的位置
    • 屏幕位置:screenXscreenY
    • 页面位置:pageXpageY
    • 客户端位置:clientXclientY
      • 键盘事件 - 哪个键被按下了
    • keyCode属性(有些浏览器使用which
    • String.fromCharCode(event.keyCode)
      • HTML5事件
    • DOMContentLoaded
    • hashchange
    • beforeunload

JavaScript API

  • 客户端存储 - localStoragesessionStorage

    1
    2
    3
    localStorage.colorSetting = '#a4509b';
    localStorage['colorSetting'] = '#a4509b';
    localStorage.setItem('colorSetting', '#a4509b');
  • 获取位置信息 - geolocation

    1
    2
    3
    4
    navigator.geolocation.getCurrentPosition(function(pos) { 		  
    console.log(pos.coords.latitude)
    console.log(pos.coords.longitude)
    })
  • 从服务器获取数据 - Fetch API

  • 绘制图形 - <canvas>的API

  • 音视频 - <audio><video>的API

使用jQuery

jQuery概述

  1. Write Less Do More(用更少的代码来完成更多的工作)
  2. 使用CSS选择器来查找元素(更简单更方便)
  3. 使用jQuery方法来操作元素(解决浏览器兼容性问题、应用于所有元素并施加多个方法)

引入jQuery

  • 下载jQuery的开发版和压缩版
  • 从CDN加载jQuery
1
2
3
4
5
<script src="https://cdn.bootcss.com/jquery/3.3.1/jquery.min.js"></script>
<script>
window.jQuery ||
document.write('<script src="js/jquery-3.3.1.min.js"></script>')
</script>

查找元素

  • 选择器
    • * / element / #id / .class / selector1, selector2
    • ancestor descendant / parent>child / previous+next / previous~siblings
  • 筛选器
    • 基本筛选器::not(selector) / :first / :last / :even / :odd / :eq(index) / :gt(index) / :lt(index) / :animated / :focus
    • 内容筛选器::contains(‘…’) / :empty / :parent / :has(selector)
    • 可见性筛选器::hidden / :visible
    • 子节点筛选器::nth-child(expr) / :first-child / :last-child / :only-child
    • 属性筛选器:[attribute] / [attribute=’value’] / [attribute!=’value’] / [attribute^=’value’] / [attribute$=’value’] / [attribute|=’value’] / [attribute~=’value’]
  • 表单::input / :text / :password / :radio / :checkbox / :submit / :image / :reset / :button / :file / :selected / :enabled / :disabled / :checked

执行操作

  • 内容操作
    • 获取/修改内容:html() / text() / replaceWith() / remove()
    • 获取/设置元素:before() / after() / prepend() / append() / remove() / clone() / unwrap() / detach() / empty() / add()
    • 获取/修改属性:attr() / removeAttr() / addClass() / removeClass() / css()
    • 获取/设置表单值:val()
  • 查找操作
    • 查找方法:find() / parent() / children() / siblings() / next() / nextAll() / prev() / prevAll()
    • 筛选器:filter() / not() / has() / is() / contains()
    • 索引编号:eq()
  • 尺寸和位置
    • 尺寸相关:height() / width() / innerHeight() / innerWidth() / outerWidth() / outerHeight()
    • 位置相关:offset() / position() / scrollLeft() / scrollTop()
  • 特效和动画
    • 基本动画:show() / hide() / toggle()
    • 消失出现:fadeIn() / fadeOut() / fadeTo() / fadeToggle()
    • 滑动效果:slideDown() / slideUp() / slideToggle()
    • 自定义:delay() / stop() / animate()
  • 事件
    • 文档加载:ready() / load()
    • 用户交互:on() / off()

链式操作

检测页面是否可用

1
2
3
4
5
<script>
$(document).ready(function() {

});
</script>
1
2
3
4
5
<script>
$(function() {

});
</script>

jQuery插件

  • jQuery Validation
  • jQuery Treeview
  • jQuery Autocomplete
  • jQuery UI

避免和其他库的冲突

先引入其他库再引入jQuery的情况。

1
2
3
4
5
6
7
8
<script src="other.js"></script>
<script src="jquery.js"></script>
<script>
jQuery.noConflict();
jQuery(function() {
jQuery('div').hide();
});
</script>

先引入jQuery再引入其他库的情况。

1
2
3
4
5
6
7
8

<script src="jquery.js"></script>
<script src="other.js"></script>
<script>
jQuery(function() {
jQuery('div').hide();
});
</script>

使用Ajax

Ajax是一种在无需重新加载整个网页的情况下,能够更新部分网页的技术。

  • 原生的Ajax
  • 基于jQuery的Ajax
    • 加载内容
    • 提交表单

前端框架

渐进式框架 - Vue.js

前后端分离开发(前端渲染)必选框架。

快速上手
  1. 引入Vue的JavaScript文件,我们仍然推荐从CDN服务器加载它。

    1
    <script src="https://cdn.jsdelivr.net/npm/vue"></script>
  2. 数据绑定(声明式渲染 )。

    1
    2
    3
    4
    5
    6
    7
    8
    9
    10
    11
    12
    13
    <div id="app">
    <h1>{{ product }}库存信息</h1>
    </div>

    <script src="https://cdn.jsdelivr.net/npm/vue"></script>
    <script>
    const app = new Vue({
    el: '#app',
    data: {
    product: 'iPhone X'
    }
    });
    </script>
  3. 条件与循环。

    1
    2
    3
    4
    5
    6
    7
    8
    9
    10
    11
    12
    13
    14
    15
    16
    17
    18
    19
    20
    21
    22
    23
    24
    25
    26
    <div id="app">
    <h1>库存信息</h1>
    <hr>
    <ul>
    <li v-for="product in products">
    {{ product.name }} - {{ product.quantity }}
    <span v-if="product.quantity === 0">
    已经售罄
    </span>
    </li>
    </ul>
    </div>

    <script src="https://cdn.jsdelivr.net/npm/vue"></script>
    <script>
    const app = new Vue({
    el: '#app',
    data: {
    products: [
    {"id": 1, "name": "iPhone X", "quantity": 20},
    {"id": 2, "name": "华为 Mate20", "quantity": 0},
    {"id": 3, "name": "小米 Mix3", "quantity": 50}
    ]
    }
    });
    </script>
  4. 计算属性。

    1
    2
    3
    4
    5
    6
    7
    8
    9
    10
    11
    12
    13
    14
    15
    16
    17
    18
    19
    20
    21
    22
    23
    24
    25
    26
    27
    28
    29
    30
    31
    32
    33
    34
    <div id="app">
    <h1>库存信息</h1>
    <hr>
    <ul>
    <li v-for="product in products">
    {{ product.name }} - {{ product.quantity }}
    <span v-if="product.quantity === 0">
    已经售罄
    </span>
    </li>
    </ul>
    <h2>库存总量:{{ totalQuantity }}台</h2>
    </div>

    <script src="https://cdn.jsdelivr.net/npm/vue"></script>
    <script>
    const app = new Vue({
    el: '#app',
    data: {
    products: [
    {"id": 1, "name": "iPhone X", "quantity": 20},
    {"id": 2, "name": "华为 Mate20", "quantity": 0},
    {"id": 3, "name": "小米 Mix3", "quantity": 50}
    ]
    },
    computed: {
    totalQuantity() {
    return this.products.reduce((sum, product) => {
    return sum + product.quantity
    }, 0);
    }
    }
    });
    </script>
  5. 处理事件。

    1
    2
    3
    4
    5
    6
    7
    8
    9
    10
    11
    12
    13
    14
    15
    16
    17
    18
    19
    20
    21
    22
    23
    24
    25
    26
    27
    28
    29
    30
    31
    32
    33
    34
    35
    36
    37
    <div id="app">
    <h1>库存信息</h1>
    <hr>
    <ul>
    <li v-for="product in products">
    {{ product.name }} - {{ product.quantity }}
    <span v-if="product.quantity === 0">
    已经售罄
    </span>
    <button @click="product.quantity += 1">
    增加库存
    </button>
    </li>
    </ul>
    <h2>库存总量:{{ totalQuantity }}台</h2>
    </div>

    <script src="https://cdn.jsdelivr.net/npm/vue"></script>
    <script>
    const app = new Vue({
    el: '#app',
    data: {
    products: [
    {"id": 1, "name": "iPhone X", "quantity": 20},
    {"id": 2, "name": "华为 Mate20", "quantity": 0},
    {"id": 3, "name": "小米 Mix3", "quantity": 50}
    ]
    },
    computed: {
    totalQuantity() {
    return this.products.reduce((sum, product) => {
    return sum + product.quantity
    }, 0);
    }
    }
    });
    </script>
  6. 用户输入。

    1
    2
    3
    4
    5
    6
    7
    8
    9
    10
    11
    12
    13
    14
    15
    16
    17
    18
    19
    20
    21
    22
    23
    24
    25
    26
    27
    28
    29
    30
    31
    32
    33
    34
    35
    36
    37
    38
    <div id="app">
    <h1>库存信息</h1>
    <hr>
    <ul>
    <li v-for="product in products">
    {{ product.name }} -
    <input type="number" v-model.number="product.quantity" min="0">
    <span v-if="product.quantity === 0">
    已经售罄
    </span>
    <button @click="product.quantity += 1">
    增加库存
    </button>
    </li>
    </ul>
    <h2>库存总量:{{ totalQuantity }}台</h2>
    </div>

    <script src="https://cdn.jsdelivr.net/npm/vue"></script>
    <script>
    const app = new Vue({
    el: '#app',
    data: {
    products: [
    {"id": 1, "name": "iPhone X", "quantity": 20},
    {"id": 2, "name": "华为 Mate20", "quantity": 0},
    {"id": 3, "name": "小米 Mix3", "quantity": 50}
    ]
    },
    computed: {
    totalQuantity() {
    return this.products.reduce((sum, product) => {
    return sum + product.quantity
    }, 0);
    }
    }
    });
    </script>
  7. 通过网络加载JSON数据。

    1
    2
    3
    4
    5
    6
    7
    8
    9
    10
    11
    12
    13
    14
    15
    16
    17
    18
    19
    20
    21
    22
    23
    24
    25
    26
    27
    28
    <div id="app">
    <h2>库存信息</h2>
    <ul>
    <li v-for="product in products">
    {{ product.name }} - {{ product.quantity }}
    <span v-if="product.quantity === 0">
    已经售罄
    </span>
    </li>
    </ul>
    </div>

    <script src="https://cdn.jsdelivr.net/npm/vue"></script>
    <script>
    const app = new Vue({
    el: '#app',
    data: {
    products: []
    },
    created() {
    fetch('https://jackfrued.top/api/products')
    .then(response => response.json())
    .then(json => {
    this.products = json
    });
    }
    });
    </script>
使用脚手架 - vue-cli

Vue为商业项目开发提供了非常便捷的脚手架工具vue-cli,通过工具可以省去手工配置开发环境、测试环境和运行环境的步骤,让开发者只需要关注要解决的问题。

  1. 安装脚手架。
  2. 创建项目。
  3. 安装依赖包。
  4. 运行项目。

UI框架 - Element

基于Vue 2.0的桌面端组件库,用于构造用户界面,支持响应式布局。

  1. 引入Element的CSS和JavaScript文件。

    1
    2
    3
    4
    <!-- 引入样式 -->
    <link rel="stylesheet" href="https://unpkg.com/element-ui/lib/theme-chalk/index.css">
    <!-- 引入组件库 -->
    <script src="https://unpkg.com/element-ui/lib/index.js"></script>
  2. 一个简单的例子。

    1
    2
    3
    4
    5
    6
    7
    8
    9
    10
    11
    12
    13
    14
    15
    16
    17
    18
    19
    20
    21
    22
    23
    24
    25
    <!DOCTYPE html>
    <html>
    <head>
    <meta charset="UTF-8">
    <link rel="stylesheet" href="https://unpkg.com/element-ui/lib/theme-chalk/index.css">
    </head>
    <body>
    <div id="app">
    <el-button @click="visible = true">点我</el-button>
    <el-dialog :visible.sync="visible" title="Hello world">
    <p>开始使用Element吧</p>
    </el-dialog>
    </div>
    </body>
    <script src="https://unpkg.com/vue/dist/vue.js"></script>
    <script src="https://unpkg.com/element-ui/lib/index.js"></script>
    <script>
    new Vue({
    el: '#app',
    data: {
    visible: false,
    }
    })
    </script>
    </html>
  3. 使用组件。

    1
    2
    3
    4
    5
    6
    7
    8
    9
    10
    11
    12
    13
    14
    15
    16
    17
    18
    19
    20
    21
    22
    23
    24
    25
    26
    27
    28
    29
    30
    31
    32
    33
    34
    35
    36
    37
    38
    39
    40
    41
    42
    43
    44
    45
    46
    47
    48
    49
    50
    <!DOCTYPE html>
    <html>
    <head>
    <meta charset="UTF-8">
    <link rel="stylesheet" href="https://unpkg.com/element-ui/lib/theme-chalk/index.css">
    </head>
    <body>
    <div id="app">
    <el-table :data="tableData" stripe style="width: 100%">
    <el-table-column prop="date" label="日期" width="180">
    </el-table-column>
    <el-table-column prop="name" label="姓名" width="180">
    </el-table-column>
    <el-table-column prop="address" label="地址">
    </el-table-column>
    </el-table>
    </div>
    </body>
    <script src="https://unpkg.com/vue/dist/vue.js"></script>
    <script src="https://unpkg.com/element-ui/lib/index.js"></script>
    <script>
    new Vue({
    el: '#app',
    data: {
    tableData: [
    {
    date: '2016-05-02',
    name: '王一霸',
    address: '上海市普陀区金沙江路 1518 弄'
    },
    {
    date: '2016-05-04',
    name: '刘二狗',
    address: '上海市普陀区金沙江路 1517 弄'
    },
    {
    date: '2016-05-01',
    name: '杨三萌',
    address: '上海市普陀区金沙江路 1519 弄'
    },
    {
    date: '2016-05-03',
    name: '陈四吹',
    address: '上海市普陀区金沙江路 1516 弄'
    }
    ]
    }
    })
    </script>
    </html>

报表框架 - ECharts

百度出品的开源可视化库,常用于生成各种类型的报表。

基于弹性盒子的CSS框架 - Bulma

Bulma是一个基于Flexbox的现代化的CSS框架,其初衷就是移动优先(Mobile First),模块化设计,可以轻松用来实现各种简单或者复杂的内容布局,即使不懂CSS的开发者也能够使用它定制出漂亮的页面。

1
2
3
4
5
6
7
8
9
10
11
12
13
14
15
16
17
18
19
20
21
22
23
24
25
26
27
28
29
30
31
32
33
34
35
36
37
38
39
40
41
42
43
44
45
46
47
48
49
50
51
52
53
54
55
56
57
58
59
<!DOCTYPE html>
<html lang="en">
<head>
<meta charset="UTF-8">
<title>Bulma</title>
<link href="https://cdn.bootcss.com/bulma/0.7.4/css/bulma.min.css" rel="stylesheet">
<style type="text/css">
div { margin-top: 10px; }
.column { color: #fff; background-color: #063; margin: 10px 10px; text-align: center; }
</style>
</head>
<body>
<div class="columns">
<div class="column">1</div>
<div class="column">2</div>
<div class="column">3</div>
<div class="column">4</div>
</div>
<div>
<a class="button is-primary">Primary</a>
<a class="button is-link">Link</a>
<a class="button is-info">Info</a>
<a class="button is-success">Success</a>
<a class="button is-warning">Warning</a>
<a class="button is-danger">Danger</a>
</div>
<div>
<progress class="progress is-danger is-medium" max="100">60%</progress>
</div>
<div>
<table class="table is-hoverable">
<tr>
<th>One</th>
<th>Two</th>
</tr>
<tr>
<td>Three</td>
<td>Four</td>
</tr>
<tr>
<td>Five</td>
<td>Six</td>
</tr>
<tr>
<td>Seven</td>
<td>Eight</td>
</tr>
<tr>
<td>Nine</td>
<td>Ten</td>
</tr>
<tr>
<td>Eleven</td>
<td>Twelve</td>
</tr>
</table>
</div>
</body>
</html>

响应式布局框架 - Bootstrap

用于快速开发Web应用程序的前端框架,支持响应式布局。

  1. 特点

    • 支持主流的浏览器和移动设备
    • 容易上手
    • 响应式设计
  2. 内容

    • 网格系统
    • 封装的CSS
    • 现成的组件
    • JavaScript插件
  3. 可视化